 We got blocked!
A Comprehensive Guide to Monster Collection
Table of Contents:
1. Introduction
2. Benefits of Monster Collection
3. Negative things about Monster Collection
4. Important Notes on Monster Collection
5. Recommended 6 hour lines
6. A Guide to obtaining Considerable Exploration Box Lines (Black Box Lines)
7. A Page By Page Guide on which monsters to collect
8. Elite Monster Collection Guide
9. Guide to Collecting Certain Rare and Specific Monsters
10. Monster Collection Guide for The Seed
11. Monster Collection Guide for Party Quests
12. Monster Collection Guide for Friendstory and Special Pages
13. Collecting Monsters using Momons (aka Monsterblooms in GMS)
14. Monster Registration Rates
15. Frequently Asked Questions
16. Credits
Note that I'm using SEA names on monsters and items, note that the names of items and monsters may vary between SEA and GMS.
Information is correct as of MapleSEA V218 (Ignition)
Information pertaining to the 233 new monsters released in Ignition will be gradually updated over time.
1. INTRODUCTION
I'm JuddStorm, also known as u/JuddtheStormcaster on Reddit. After receiving some feedback, I've decided to upload a comprehensive guide to the forums to guide others on monster collection.
2. Benefits of Monster Collection
Good things about monster collection:
- Constant flow of mileage (Note that there is an overall mileage cap per day)
- Crimson flames, epic pot scrolls and yellow cubes can be obtained occasionally from running exploration boxes
- You can obtain Cube Chairs by completing specific collection pages
- Trait items are handy for getting the charm level of mules to level 30 to unlock pocket slots,
- You can get some spell traces from exploration at a decent chance
- For Medal Collectors, you can obtain a number of medals from Monster Collection
Q: How do I run an exploration?
To unlock an exploration line, you'll need to collect a line of monsters, the number of hours for the exploration depends on the line itself which varies - 1hour, 3hour, 6hour and 24hour lines. In addition, collecting a line of monsters will yield a box.
In the picture below, I have sent 5 24hrs lines of monsters for exploration. To send monsters on exploration, click on the exploration tab and then select a line to send the monsters on an exploration. A player will start with two exploration lines already unlocked from the start with the third unlocked at 150, fourth at 300 and the final at 600.
Q: What are Cube Chairs?
Cube Chairs are stackable chairs that can be customised to your liking using different cube/ chairs. Seen below is a character sitting on a stackable Cube Chair consisting of chairs from Monster Collection, from top to bottom: Orange Mushroom, Scuba Pepe, Specter Dog, Ripe Wolfroot, Water Thief Monster and Tino Cube Chairs. These cube chairs are compatible with other cube chairs such as the heroes cube chairs from the Heroes of Maple storyline.
Here is a Yeti from the Pink Bean & Yeti World Event sitting on an Orange Mushroom Cube Chair
List of rewards from Monster Collection Explorations (Work in Progress)
Many thanks to all the contributors in the Monster Collection Discord Group for helping me gather and compile the data for the rewards from exploration
1 hour exploration rewards:
5-10 mileage (possible amounts are 5, 8 and 10)
1 quantity of random trait item, and
25 to 35 spell traces (requires further testing) OR a Suspicious Cube
3 hour exploration rewards:
Some mileage (TBD)
TBD quantity of a trait item or a trait boost potion (incredibly rare), and
ONE of the following: (TBD quantity) of spell traces, a yellow cube, a carved silver seal or TBD number of Suspicious Cubes
6 hour exploration rewards:
40 to 65 mileage (mileage is in increments of 5)
5 to 7 of a random trait item or a trait boost potion (incredibly rare), and
ONE of the following: 80-120 spell traces (increments of 10), 3 Suspicious Cubes, a yellow OR purple cube, a carved silver OR gold seal, an epic potential scroll 50%, a crimson resurrection flame
24 hour exploration rewards:
110 to 170(?) mileage per bundle (require confirmation on maximum amount)
7 to 10 of a trait item or a trait boost potion (incredibly rare), and
ONE of the following: 160 to 300 (average seems to be 200, requires more detailed testing) spell traces, a yellow OR purple cube, a carved silver OR gold seal, an epic potential scroll 50%, an additional potential scroll 50%, a crimson/rainbow resurrection flame or 5 Suspicious Cubes
List of medals that can be obtained from Monster Collection
When you collect a certain number of monsters from a region, you can receive a medal for that corresponding area. These medals give all stats +2, +300 HP/MP and +1 weapon/magic attack.
Note that for the purpose of medal count, if you receive it on one character, all the other characters in the same world will also receive the medal in their Medal Collections as seen in the below screenshots. If you wish to, you can also re-issue the medals to another character in the same world once you've obtained them.
This is on my main character:
This is on my Level 200 beginner, which I've collected the medals on.
There are currently a total of 14 medals in MapleSEA as listed below:
Victoria Collector - Collect 50 monsters in the Victoria Island section
Victoria Hero - Collect 100 monsters in the Victoria Island section
Victoria Isles Explorer - Collect 45 monsters from the Victoria Isles section
Special thanks to Young Rhinne of MapleSEA discord for the above image
Edelstein Collector - Collect ALL 50 monsters from the Edelstein section
El Nath Mountains Collector - Collect 50 monsters from the El Nath section
Ludas Lake Collector - Collect 50 monsters from the Ludas Lake section
Deep Sea Collector - Collect 20 monsters from the Aqua Road section
Nihal Desert Collector - Collect 40 monsters from the Nihal Desert section
Mu Lung Collector - Collect 35 monsters from the Mu Lung Garden section
Minar Forest Collector - Collect 50 monsters from the Minar Forest section
Time Temple Collector - Collect 50 monsters from the Temple of Time section
Grandis Collector - Collect 50 monsters from the Grandis section
Collector of Arcane River - Collect 50 monsters from the Arcane River section
Friends' Collector - Collect ALL 35 monsters from the Friends section
3. NEGATIVE THINGS ABOUT MONSTER COLLECTION
The process is incredibly long and tedious, trust me, there will be at times where you just want to give up on that one monster, you need to have that determination to continue this long journey, this process is not done in one day, not done in one week, it takes months to years to do this, while there are shortcuts and loopholes to collect certain (mostly boss) monsters, others depend on your ability or extreme luck such as:
- Certain bosses which may requires massive fundings or carries, also, note that PRACTICE MODE BOSSES DO NOT COUNT
- Finding people to do party quests with you (there are quite a number of PQ related monsters in the collection)
- Elite Monsters that require a specific elite (and not 100% chance to register),
- Low Spawn Monsters with the odds stacked against you such as Missile Android Red/Blue (Salvoroid Red/Blue), Remodeled Failed Android (Modded Megaroid) to name a few
- Boss Monsters that are coded as regular monsters making them extremely difficult to register due to their rarity, this applies to King Castle Golem from Lionheart Castle, Giant Golem and Reverse Dark Soul (Blackheart Negative) from Labyrinth of Suffering which are treated as boss monsters in the game but are coded as regular monsters for the purpose of monster collection
- Monsters from The Seed, notably the two ancient beetles as it takes quite some time and lots of practice to be proficient in The Seed to be able to get to the end, and then it still requires luck to register them
- Monsters that requires you to create a specific character to collect them, of which some of these monsters can't be collected once you've completed their storylines
- Anti-AFK monsters that spawn one per map, and there are a number of these in Monster Collection
4. IMPORTANT NOTES ON MONSTER COLLECTION AND TIPS
4.1 Monsters are registered on a SAME NAME basis, that said, you can register Horus from Mirror World Pyramid while doing Zero's questline and you can collect Poison Golem by doing Monsterpark Ellin Forest (see spoiler below)
4.2 Mirror World is useful for farming various bosses and certain monsters that can only be entered a limited number of time a day such as Alishar (Ludi PQ), Horus (Pyramid PQ) and Giant Dark Soul (Dimensional Invade) which are monsters from Party Quests.
In GMS, you can register Advisor Mummy (Pyramid PQ) from the Pyramid Dungeon similar to Horus and Papa Pixie through a Mirror World Magatia storyline quest. These two examples does not work in MSEA as Advisory Mummy and Papa Pixie are labelled differently from the requirement making it impossible to use this workaround.
4.3 A lower level monster is significantly easier to collect compared to a higher level monster. This does not affect elites and bosses. Note that certain boss monsters such as Reverse Dark Soul are classified as regular monsters in Monster Collection.
For Level 121 and above monsters, the registration rate is on average 1 in 3000 based on data collected in 2016 on the now defunct Insoya site (Referenced from Southperry's Monster Collection thread dated 24 June 2016). As covered in Section 4.1, all monsters are registered on a same-name basis regardless of appearance.
For more information, check out Section 14 below on Monster Registration Rates. Currently, I've tested and discovered that there is a pity cap kill limit before registering for regular monsters Level 100 and below, with testing ongoing for monsters Level 101-120.
Here is a brief summary for pity cap:
Monster Level 1-10: 100 kills
Monster Level 11-20: 200 kills
Monster Level 21-30: 240 kills
Monster Level 31-50: 320 kills
Monster Level 51-70: 500 kills
Monster Level 71-100: 1650 kills
4.4 Benefits of using Explorer Archer's link skill
Explorer Archer's link skill gives you a 35% increase in chance to register monsters (at Level 6), it is recommended to train Bowmaster, X-Bowmaster and Pathfinder to at least Level 120 to obtain the Level 2 link from each class to help you in your journey in monster collection.
With +100% collection Sunday Maple bonus, you'll have 2.35x chance of collecting a new monster, noting that the 100% Sunday Maple bonus and the Archer link stacks additively.
4.5 You can register a monster even if the map is cursed by a rune penalty as seen in the screenshot below.
This also applies to the death penalty that reduces your exp and item drop rate as Monster Collection registration rate ignores item droprate chance.
4.6 Monster Naming Differences:
Please pay attention to the name of the monster required by the collection and hunt for the correct monster based on the name requirement and not by appearance, DO NOT EVER assume that it is the "correct monster" because it looks similar. I have provided two examples below:
Note that the example does not apply to GMS as Easy mode Arkarium and Mu Lung Dojo Netherworld Monks variants can all be used to register "Netherworld Monk"
The monster we're looking for is Netherworld Monk:
As seen below, Netherworld Monk can be farmed via Mihile's quest variant Arkarium (note that Mihile characters that did not access quest Arkarium prior to Cygnus Knights remaster will not be able to access this map.
However, Easy Mode Arkarium summons Otherworldly Priest instead of Netherworld Monk, hence, it is NOT possible to collect Netherworld Monk via Easy Mode Arkarium, this also applies to the Mu Lung Dojo variant as the monsters are named differently from the target monster.
At first glance without hoovering over the name, you might assume that the Eye of Time monster is assigned a two star difficulty since they are a low spawning monster compared to every other field monster in Temple of Time.
When you hoover over its name, you'll realise that there is a [*] in front of its name, this indicates that you will be required to hunt a Starforced variant of the monster instead of the original monster as seen below:
5. RECOMMENDED 6 HOURS LINES TO OBTAIN
There are over 40 different lines that yields a 6 hour exploration box. However, many of these comes with a catch or gimmick such as an elite monster or a hard to obtain monster. Typically, the easier ones will contain one boss monster and about three or four regular monsters. As such, I've decided to classify the recommended lines into Best, Good and Other categories with an explanation for each of my choices.
None of the lines in this section will contain elite monsters.
BEST 6 HOUR LINES TO OBTAIN
In my opinion, these lines are the best due to their low difficulty in collection and it is worth spending a bit of time to collect those lines of monsters to obtain a few 6 hour lines to run for exploration.
5.1 Black Viking Line, Victoria Island Page 4, bottom line
This line requires Black Viking along with two regular monsters and a quest mob named Viking Legion.
Despite having a farmable quest monster with limited spawnrate, all the regular monsters are in the Level 60+ range, making it way easier to collect them as compared to most of the monsters in this 6 hour lines recommended list.
Viking Legion (Viking Squad in GMS)
In order to farm Viking Legion, you'll need to complete the Mushroom Castle questline until you received this quest. Specifically, the quest after defeating 50 Weary Vikings (Tired Vikings in GMS).
In order to farm Viking Legion, you'll need to forfeit the quest after entering the map as if you successfully defended the castle door from the viking invasion, you will not get a second chance on that character to register Viking Legion in the event you that do not register it. If you forfeit the quest, you'll need to walk back to town (or use a nearest town scroll) to receive the quest again.
Alternatively, you can exit the game before the one minute is up and it would count as mission failure.
Viking Legions alternates spawns in waves of 4 and 5 per wave with the occasional 3 monsters in a wave, this would roughly give you about 30+ monsters per round.
Viking Legion registered (I had to do it on another character as I forgot to forfeit the quest), it total took me a total of 237 kills over 8 rounds.
5.2 Green Trixter, [*] Klock & [*] Dark Klock Line, Ludas Lake Page 5, Line 1
This line consists of three easily accessible monsters. Green Trixter which have a spawn capacity limit of 10 at Eos Tower Floor 93 (limited designated spawnpoints) and two starforced Klock monsters sharing a map.
Despite the horrendous map terrain for Green Trixter, I feel that the main difficulty of this line comes from Dark Klock since they have a much lower spawnrate than Klock. Overall, the difficulty is on the lower end in my opinion as this line requires you to simply farm in two readily accessible maps for three monsters (although starforce is required bypass the damage reduction on the starforced monsters).
5.3 Werewolves Line, El Nath Page 2, Line 4
This line requires Werewolf, Lycanthrope, Riche (Lich in GMS) and Snowman. Werewolves and Lycanthropes have their own pure spawning maps.
Snowman appears in Sharp Cliff 3 or can be summoned and fought in Tangyoon PQ as a workaround method as the "literal" snowman in Tangyoon shares the same name as the Yeti Snowman boss.
Riche appears in Forest of Dead Trees 4 and inside the Mystic Gate in the same map and in Monster Park - Dead Tree Forest.
GOOD 6 HOUR LINES TO OBTAIN
The lines below can be collected by training in their respective areas, with no elite monsters or anti-AFK monsters required, they are straightforward and low in difficulty for a 6 hour line.
5.4 Corrupted Spirit of Harmony Line, Arcane River Page 3, Line 3 (Minimum Level 225 required)
This line consists of four Arcana cave monsters that you can collect easily while training and/or doing your Arcane Symbol Dailies.
For Corrupted Spirit of Harmony, you'll need to talk to Spirit of Harmony in Arcana town after completing the questline. You'll then be brought to a map with the Corrupted Spirit of Harmony. This can be repeated as many times as you like (or until you collected Corrupted Spirit of Harmony)..
For GMS users, you can also register the Corrupted Spirit of Harmony from Monster Park Arcana (this is not possible in MSEA as it is incorrectly named as "Spirit of Broken Harmony").
5.5 Celestars Bright Sea and Shipwreck Zone Monsters, Arcane River Page 7, Line 4 (Minimum Level 240 required)
A straightfoward line consisting of five regular monsters for a 6 hour box which you can obtain while training characters in Celestars (Sellas in GMS).
5.6 Rock Spirit Line, Victoria Island Page 7 (Kerning Tower), Line 4
There are four regular monsters and a boss, Rock Spirit.
To collect Rock Spirit, you'll need to complete Kerning Tower's questline and click on the strange guitar in the Penthouse where you'll be brought to a map with Rock Spirit. This can be repeated as many times as you like (or until you collected Rock Spirit). In addition, it is possible to register Rock Spirit while doing the questline.
OTHER 6 HOUR LINES
The following lines are straightforward and easy to collect, with the main difficulty being that these monsters are limited by daily entry/clear limits which would take a bit of time to complete.
5.7 Normal Root Abyss Line, Victoria Island Page 5, Line 4
You'll need to collect the four bosses from Root Abyss (Normal Mode) for this line.
By doing Normal Root Abyss running the four bosses daily, it is only a matter of time and luck before you collect them.
5.8 Faust - King Slime Line, Victoria Island Page 9, Line 3
Two regular monsters from Kerning City with trivial collection difficulty alongside two Dojo bosses. King Slime appears on the 6th floor and Faust appears on the 9th floor. You get three attempts per day at Dojo per character and as such, if you consistently run Dojo, it is only a matter of time before you collect the two monsters required from Dojo.
Note that you can only collect Faust from Dojo.
6. A GUIDE TO OBTAINING CONSIDERABLE EXPLORATION BOX LINES
There are currently a total of 21 Black Box lines that can be obtained, while I'll list out all 21 lines, I have personally recommended 6 lines as follows.
RECOMMENDED 24 HOUR LINES TO OBTAIN
6.1 Ephenia Line, Ludas Lake Page 3, bottom line
Difficulty: Very Easy
Limitations: Neon Bat and Peace Spirit are only accessible in Dimensional Library.
Explanation: The main difficulties of this line comes from the 2 mobs from Dimensional Library. It is recommended to farm these mobs in the Dimensional Library while during the quest as the map after you completed the questline has a terrible spawnrate.
Ephenia can be encountered after completing the Ellin Forest questline and there is no limits on how many entries per day you can enter and defeat her.
6.2 Magnus Line, Grandis Page 2, bottom line
Difficulty: Easy (GMS), Medium-Hard (MSEA)
Limitations (GMS): The trio of Magnus' minion bosses can only be fought upon completing a rather lengthy storyline. Magnus can be defeated in any mode or found in Friendstory Stage 3
Explanation (GMS): You'll need to defeat three area minion bosses instead of just one for Ephenia. As for Magnus, you can just run Easy/Normal Magnus daily or shoot soccer balls at him in Friendstory Stage 3 (See Section 9 for more information). Another method is to complete the 5th job advancement where you get to defeat Magnus.
Limitations (SEA): Only Hard Magnus will count towards the monster collection, hence, you can't use Friendstory or even kill Easy/Normal Magnus to complete this line.
Explanation (SEA): Even if you can defeat Hard Magnus, it is still luck-dependent to obtain Hard Magnus since you're limited to 1 (or 2 with a reset ticket) clear per week per character.
6.3 Cygnus Line, Temple of Time Page 3, bottom line
Difficulty: Medium
Limitations: Cygnus can be cleared once a week per character, regardless of boss difficulty
Explanation:
Cygnus can no longer be repeatedly farmed when you defeat her for a Cygnus Knight's 4th job advancement as of the Cygnus Knights remaster in MSEA V218 as you will be teleported out a few seconds after defeating Cygnus, as such, you will only get one attempt at collecting her per Level 100 job advancement.
As such, you'll need to defeat her in Easy or Normal mode for a chance to register her. To speed up the process, buy Cygnus reset tickets from Kritas or run Cygnus on mules.
To register Shinsoo, you can use a mule and enter Easy Cygnus and allow Easy Cygnus to summon Shinsoo repeatedly. Note that there is a 30 minute cooldown between entries and you can enter Cygnus as many times as you like provided that you did not clear Easy or Normal Cygnus that week for that character.
Ifrit can be easily registered while farming Advanced Knight B using characters training at Knight Chamber 2. The knights will only summon Ifrit when provoked, as such, if you're one-shotting them, they won't summon Ifrits.
6.4 Chryse Line, El Nath Page 1, bottom line
Difficulty: Medium
Limitations: Golden Scorpie, Golden Mammoth and Xerxes are limited by daily entry limits
Explanation: Each character is limited to 5 tries per day in Chryse PQ. As such, it might take a while to register those monsters mentioned above. For more information, check out Section 11.2 - Xerxes in Chryse.
6.5 Horntail Line, Minar Forest Page 3, bottom line
Difficulty: Medium
Limitations: Normal Horntail and Chaos Horntail are limited by shared daily entry limits.
Explanation: This line isn't really difficult if you can defeat Chaos Horntail comfortably, but it would probably take some time to register as Horntail and Chaos Horntail have a shared daily entry limit of 1 per character.
Horntail and Chaos Horntail cannot be registered directly by killing their body parts. Instead, Horntail and Chaos Horntail have a low chance of dropping their Momon/Monsterbloom when defeated as seen in the picture below (the item that resembles a purple egg)
Horntail Momon/Monsterbloom
Chaos Horntail Momon/Monsterbloom
In addition for GMS users, Horntail can be registered by killing the Mirror World Horntail head in Chapter 1 of Zero's Storyline. Provided that if you do not turn in the quest, you can defeat Horntail's head repeatedly to collect him by exiting and re-entering the quest room.
This is not possible in MSEA due to a naming inconsistency as the Mirror World Horntail is named "horntail" instead of "Horntail" - the name must be an exact match otherwise it cannot be registered.
6.6 Pink Bean Line, Temple of Time Page 1, bottom line
Difficulty: Medium-Hard
Limitations: Chaos Pink Bean can only be cleared once a week and you're limited to one entry per day for Chaos Pink Bean.
Explanation: Chaos Pink Bean is limited to one clear per week. As Chaos Pink Bean have a total of three forms, killing each form will have a chance to register Chaos Pink Bean into the collection.
If you chose to exit the map before defeating Chaos Pink Bean's third and final form, you can try again as it would not count as a clear.
OTHER 24 HOUR LINES
6.7 Chaos Root Abyss Line, Victoria Island Page 5, bottom line
Difficulty: Hard
Limitations: Four bosses with limited weekly clear limits
Explanation: This line is heavily dependent on luck. While it is a straightforward line without any gimmicks, the player's chances of obtaining the four bosses quickly depends on whether luck is in their favour. A player can also purchase a reset ticket of their choice from Kritas for a second entry attempt to register the boss.
In GMS, you get two chances per successful clear for Chaos Crimson Queen and Chaos Pierre. Defeating the boss would give the player a chance to collect the monster in question. The second chance comes from the player "killing" the box as the box in chaos mode box shares the same exact name as the monster itself.
6.8 Damien Line, Victoria Island Page 6, bottom line
Difficulty: Very Hard
Limitations: Damien have a weekly clear limit. The Eagle Rider have a heavily limited spawn and only spawns occasionally.
Explanation: Two difficult to obtain monsters with different limitations imposed. Damien can only be cleared once a week each for the Heroes of Maple Act 4 and the actual Damien battle in Fallen World Tree. On the other end of the spectrum, the Eagle Rider is time consuming as it have heavily limited spawnrate which means that the player would have to get extremely lucky while training characters or dong fallen world tree weeklies to register the monster or to channel/map surf and hope that it registers upon killing.
6.9 Dorothy Line, Victoria Isles Page 2, bottom line
Difficulty: Extremely Hard and Heavily Dependent on Luck
The Seed Limitations: The player needs to be able to clear The Seed Floor 50 to be able to access and defeat Dorothy. Even if the player is very experienced with The Seed, it is extremely time consuming to do full runs of The Seed.
Additional Monster Collection Limitations: The two beetles on Floor 48 have a heavily limited spawn, moreover, a player cannot farm these two monsters as Floor 48 cannot be practiced with a seed practice ticket.
Explanation: See Monster Collection for The Seed in Section 10 for detailed information on each of the specific monsters.
6.10 Lotus Line, Edelstein Page 2, bottom line
Difficulty: Very Hard
Limitations: Modded Megaroid have a very low spawnrate and there is an elite monster that you have to register to obtain this line.
Explanation: Lotus can be reliably obtained during the Black Haven questline (see: Section 9) or for players that are able to solo Normal Lotus, they can repeatedly farm Lotus by killing the second phase, exiting the battle and re-entering 30 minutes later for another attempt.
The Modded Megaroid is a regular monster that spawns occasionally in groups of 2-4 in certain maps, hence, it can be time consuming and luck-dependent to register it.
6.11 Rex Line, El Nath Page 2, bottom line
Difficulty and Limitation: Finding another player to do the PQ with you on a regular basis (or alternatively, have another PC/laptop/device to do the PQ)
Explanation: The daily entry limit of 5 per character isn't the biggest issue for the line, it is getting someone to help you to enter the party quest due to the two player minimum requirement.
For more information, check out Section 11.3 - Resurrection of the Hoblin King below
6.12 Pianus Line, Aqua Road (only page), bottom line
Difficulty: Luck Dependent
Limitation: That one elite monster
Explanation: Collecting Pianus and Bloody Boom is nothing compared to that elite monster. The elite monster required for this line spawns in a mixed spawn map with a fairly low level limit (highest level to naturally spawn an elite in that map is Level 129) and a really annoying terrain makes it a line that relies heavily on your luck to complete.
You can register Pianus and Bloody Boom using the mystic gate that appears in the map before Pianus, note that you'll need to clear Chapter 3 of the Silent Crusade storyline and to be Level 140 to gain access by starting Chapter 4 of the questline (it would take you a day as you'll exhaust all 15 entry counts to fully complete up to Chapter 3).
6.13 Aswan Line, Nihal Desert Page 1, bottom line
Difficulty: Extremely Hard and Heavily Dependent on Luck
Open the spoiler below for a detailed explanation on each of the monsters
Credits to PirateIzzy for information pertaining to GMS monster variants.
6.13.1 Deadly Altar (First monster from the left)
Deadly Altar is a summoned monster that appears in both regular and Hard Hilla battles. What makes this monster so difficult to register is that Hilla only summons them periodically with a very lengthy cooldown between summons.
6.13.2 Spearman Skeleknight (Second monster from the left)
Spearman Skeleknight only spawns in Dimension Invade Stage 5 and are protected by an Obselik Shield which you must defeat before you can clear these monsters. All other variants of the monster do not count for the Monster Collection.
To add to the difficulty, the stage have a condition where if too many of these monsters were spawned, the player will fail the party quest, hence, making it very difficult to "farm" these monsters as the moment the Obselik Shield is defeated, new monsters will only continue spawning for the next 30 seconds.
6.13.3 Bloodfang (Third monster from the left)
Bloodfangs only spawn while on the way to Hilla (both regular and hard mode). Upon clearing each of the first two maps, three Bloodfangs will appear. In addition, Hard Hilla will occasionally summon Bloodfangs during the battle when her HP is depleted below a certain point.
Note that Dimensional Invade Bloodfangs do not count as they are named differently.
6.13.4 Grey-Haired Hilla - A.K.A. Hard Hilla
As the monster collection specifically asked for Grey-Haired Hilla, this monster is limited to one clear per week per character, as such, it may take quite some time to register her due to the entry/clear limitations.
6.13.5 Giant Dark Soul (The rightmost monster)
Giant Dark Soul (Giant Darkheart) can be registered through both Dimension Invasion and Mirror World Kritas (both easy and hard mode). The recommended method to collect Giant Dark Soul is through Mirror World Kritas as you are not guaranteed to encounter Giant Dark Soul after stage 5 in Dimension Invasion during the bonus stage.
6.14 Mu Gong Line, Mu Lung Page 1, bottom line
Difficulty: Luck Dependent
Limitations: Collecting Mu Gong
Explanation: Mu Gong accounts for the main difficulty of the line as he spawns every 12 hours at Territory of the Wandering Bear, with the first Mu Gong appearing 12 hours after a server check is completed. This can be challenging if you are playing on a populated server or if someone else is also trying to find and collect Mu Gong.
The other monsters are relatively easy to add for a 24 hour line, requiring two regular monsters, Grizzly and Panda, and Tae Roon, a field boss that also spawns at Territory of the Wandering Bear with an estimated respawn time of 25-30 minutes after being killed.
While it can be debated that this line among the easiest to collect as all of the monsters are field monsters/bosses, I personally do not put this in the recommended 24 hour lines because it can be difficult to find Mu Gong and hoping that you register him quickly.
Mu Gong will always spawn at the bottom platform of Territory of the Wandering Bear. When he appears, a blue text message will appear as seen in the below screenshot, similarly to most field bosses.
For me, it took me a total of 5 runs of channel surfing (over a span of 48 hours, checking back every 12 hours) before registering him while others have reported to have registered him in 10 tries or less.
6.15 Lucid Line, Arcane River Page 2, bottom line
Difficulty: Extremely Hard
Limitations: The Nightmare Mushroom have an incredibly low spawnrate
Explanation: At first glance, you might think that the difficulty lies in collecting Lucid as you have to defeat her to register her. However, Lucid can be collected in her story mode workaround.
The Nightmare Mushroom spawns occasionally during the Phase 1. Unlike the golems, all modes of Nightmare Mushrooms will disappear after a short while, the challenge is to deplete the HP of the mushroom before it disappears to count as a kill.
6.16 Black Mage Line, Arcane River Page 5, bottom line
Main Difficulty: Depends on whether you can at least clear Black Mage (Phase 2) and by extension, Heretic Hilla as you'll need her etc to enter the map.
Monster Collection Limitation: Besides the above, Black Mage have a daily entry limit that is restricted by Heretic Hilla's untradable etc (noting that Heretic Hilla herself have a weekly clear limit) and a monthly clear limit.
Explanation: Black Mage have a chance to be collected three times during a full run clear. Killing each of Black Mage's phases for Phase 2 to 4 will be counted as a kill and hence, a chance at registration. Note that due to the monthly clear limit for Black Mage (full clear run), it may take a long time to collect Black Mage for players who do Black Mage on a monthly basis.
6.17 Divine King Slime Line, Victoria Island Page 9, bottom line
Difficulty: Luck Dependent and Extremely Hard
Limitations: Collecting the summoned monsters
Explanation: You will need to collect four summoned monsters which have a low spawnrate, it is luck dependent to spawn Halo Slimes notably in normal mode, while Bomb Slimes will explode when it approaches near the player which will cause the monster to despawn, making them annoying to collect. In addition, the summoned slimes are extremely tanky which could make them difficult to farm in chaos mode due to their HP.
6.18 Chosen Serene Line, Grandis Page 7, bottom line
Difficulty: Depends on whether you can clear Normal Serene phase 1
Explanation: Similar to Black Mage, you just need to collect one monster to complete this line. This line is "significantly easier" than Black Mage in a way that you are not limited by any item to enter the map to attempt to defeat Normal (or Hard) Serene. Note that as long as you do not defeat the second phase, you can attempt to collect her three times a day per mode by clearing Phase 1 and leaving the battle.
6.19 Gatekeeeper Kalos Line, Grandis Page 8, bottom line
Difficulty: Insanely Hard
Explanation: Where should I start? This line is basically a combination of everything nasty in one.
While you can collect Gatekeeper Kalos by killing Phase 1, the summoned monster will only appear after Kalos second phase HP reaches below 50%. In addition, the summoned monster will self-destruct similar to a bomb slime from Divine King Slime when near a player, making them extremely difficult to collect.
Two anti-afk monsters and one elite boss from Odium which requires minimum Level 275 to even access, combined with the Authentic Force (Sacred Power) requirement also contributes massively to the difficulty. These monsters also require a ton of luck to collect, with anti-afk monsters having low spawnrate and spawning the correct prefix on the elite boss and hoping it registers.
6.20 Arcane River Elite Bosses Line, Arcane River Page 8, bottom line
Difficulty: Luck Dependent and Extremely Hard
Explanation: Five different elite bosses that appears in the field maps up to Arcane River. It is luck dependent to even spawn the correct elite boss, let alone matching the prefixes exactly and the fact that it is not a guaranteed register makes the line extremely hard.
Alternatively, you can get a character to Level 255 and farm the elite bosses in the Limen storyline Djunkel bossroom. Djunkel will spawn one elite boss at random with two different prefixes every 30 seconds. Even with this workaround, it is still highly luck dependent to even spawn the correct prefixes. In the event you accidentally killed Djunkel, disconnect from the game during the cutscene in order to have another attempt at collecting the elite bosses.
6.21 Extreme Bigfoot Line, Special Page, bottom line
Difficulty: Luck Dependent
Limitations: You can only run Monster Park Extreme once a day to collect Bigfoot, hence, it will either take time or luck to register it quickly. In addition, you need to be at least Level 260 to access Monster Park Extreme.
Explanation: Being a popular content that gives an amazing amount of EXP, it should not be too difficult to find a party to hunt Extreme Bigfoot once a day. The other four monsters in the line are obtained by running the PQ and killing the monsters when they are required by the PQ.
7. A PAGE BY PAGE GUIDE ON WHICH MONSTERS TO COLLECT
Contents:
7.1 Introduction
7.2 A page by page breakdown
7.1 Introduction
When I was re-writing this guide to make it more user-friendly, I was thinking of a way to sort out which monsters would be considered as the "easiest" to obtain and it could be very subjective, as such, I decided to simply list out every single page in the collection and recommend them in this format:
PAGE NAME (Recommended for: 150/300/600)
[Insert Description of Page and Monsters to avoid]
Total Monsters for this page: n monsters
But before we get into the page by page recommendation, did you know you can get your very first monster right away? Just click on that light bulb relating to monster collection to receive a simple monsterbloom to register Poison Flower.
Side Note: I have no idea where does Poison Flower even appear in this game. The monster appeared in the files when Ellin Forest PQ was introduced in the game, however, this monster never appeared in the PQ or anywhere else for that matter, as such, it is virtually impossible to obtain except using the monsterbloom given by the quest.
7.2 A Page By Page breakdown on recommended monsters to collect
As a general rule of thumb, I avoid Party Quest Monsters, rare spawn Monsters and Elite Monsters, certain bosses such as Damien, Chaos Root Abyss, Mu Gong etc.
The Seed, Friendstory and Special pages are not included in the page by page breakdown, and instead, are given their own section below in this guide.
In addition, Arcane River Pages 7 & 8, El Nath Page 4, Cernium, Hotel Arcs, Odium are currently omitted from this section as the main purpose of this page is to recommend monsters for the 600 monsters collected goal. I may add them in the future but as of now, they are not included.
NOTE: I use Chaos Horntail/Normal Pink Bean as the benchmark for bossing, any boss that is harder than that benchmark will NOT be included in the guide.
For monsters that appears exclusively inside mystic gates, note that there is a daily limit of 15 mystic gates entry per character if you want to farm that particular monster (shared across all gates).
In Summary:
For 150 monsters, my recommendations are just simply low level monsters including area bosses (aka below Level 121).
For 300 monsters, my recommendations are almost similar to 150 monsters but also includes job specific monsters and monsters that hoover around the Level 120 range.
For 600 monsters, I have listed which monsters to avoid collecting in each page which mostly consists of elites, difficult bosses and rare spawning monsters.
Information is accurate as of MSEA V218
Click on the spoiler to see the page by page breakdown:
I used red crosses (X), blue circles and green circles as indicators:
Red X indicates that that monster should be avoided for the purpose of collecting 150/300/600, this includes Party Quest Bosses that can be collected from Monster Park, Mirror World and Dojo.
Blue circles indicate that this monster have a limited entry daily, this is usually indicated on boss monsters.
Green circles indicate that this monster can only be accessed via a specific character and/or quest.
Victoria Island Page 1 (Recommended for 150/300/600)
Collect all the monsters in this page except the two elites, Obese Pig and God of Cookery. Zombie Mushmom spawns at Ant Tunnel Square 2.
Total: 19 Monsters
Victoria Island Page 2 (Recommended for 150/300/600)
Collect all the monsters except the elite Wooden Mask and Ice Golem.
Total: 21 Monsters
To collect the Ice Golem, you'll need to complete El Nath Page 2, Line 2 which requires a Dark (Shadowy) White Fang elite monster to obtain its monsterbloom.
Victoria Island Page 3 (Recommended for 150/300/600)
Avoid the three elite monsters. Mole King and Captain Darkgoo can be accessed by completing Elliniel Fairy Academy and Gold Beach Theme Dungeon respectively.
Total: 18 monsters
Victoria Island Page 4 (Recommended for 150/300/600)
Collect everything except the two elite monsters. In order to obtain Prime Minster Mushroom for monster collection, you'll need to complete Black Viking Line to obtain its Monsterbloom.
Lord Skeleton can be accessed via the mystic gate in the Perion Excavation Site.
Total: 20 monsters
Victoria Island Page 5 - Part 1: Top two lines (Recommended for 150/300)
Collect everything except the elite Taurospear. Balrog Boss can be entered up to 7 times a day per character and killing Balrog's hands also counts towards registering Balrog.
Total: 9 monsters
Victoria Island Page 5 - Part 2: Bottom three lines (Recommended for 600)
If you do Normal Root Abyss diligently, you would be able to register the regular mode seal guardians. The Elite Imps can be found in a map of their own which can be accessed after completing the Root Abyss questline while the regular Blazing and Spear Imps can be found on the map before the boss(es) itself.
Note that there is a 30 minute cooldown between Normal Mode entries if you did not clear the boss(es) and as such, I indicated the regular ones with blue circles as they are considered to have a limited entry.
For the purpose of this guide, I did not include Chaos Root Abyss bosses.
Total 8 monsters
Victoria Island Page 6 (Recommended for 600)
The top three lines (excluding the Imp) are monsters from Crimsonwood Castle, these monsters are Level 130 and above.
In order to encounter Master Red Nirg, you'll need to run Crimsonwood Castle questline and finish it, for more details on how to collect Master Red Nirg, follow the guide below in Section 9.2
The bottom two lines consists of Fallen World Tree monsters. I recommend collecting them while doing your Fallen World Tree weeklies. For the purpose of collection, I've excluded the elite, Damien, the eagle rider and the Fallen Imp (the latter two being anti-AFK mobs with an extremely poor spawnrate).
Total: 17 monsters
Victoria Island Page 7 aka Kerning Tower (Recommended for 600)
Collect everything except the elite. In order to collect the two special monsters on the top line, you will need to complete the third and fifth lines respectively.
Total: 21 monsters
Victoria Island Page 8 - Part 1: Top 3 lines (and 1 other monster) (Recommended for 150/300)
The top 3 row contains easy to collect monsters along with another low level monster on the fourth row (noting that Elludin monsters have a maximum upper level limit of 59), collect everything except the elite.
Total: 15 monsters
Victoria Island Page 8 - Part 2: Bottom 2 lines (Recommended for 600)
Collect all the monsters except the two elites. To collect the boss of Partem, follow the guide below in Section 9.2
Total: 7 monsters
Victoria Island Page 9 - Part 1: Top 3 rows (Recommended for 150/300)
Regular monsters that were left out originally from Monster Collection alongside two bosses that are found in Dojo. For the purpose of collecting up to 600, you can omit the Dojo bosses.
Total: 11 monsters
Victoria Island Page 9 - Part 2: Bottom 2 rows (Recommended for 600)
See Section 9.4 below on Baby Balrog. Avoid the Divine King Slime line.
Total: 4 monsters
Victoria Isles (SEA)/Near Victoria (GMS) Page 1 (Recommended for 150/300/600)
Collect everything except the elite.
Total: 22 monsters
Edelstein Page 1 (Recommended for 150/300/600)
Collect everything except the elite.
Total: 24 monsters
Edelstein Page 2 (Recommended for 600)
This page is filled a number low spawning mobs alongside THREE elites and Lotus. Due to the high number low spawning mobs in this page, I recommend collecting these monsters while doing Scrapyard weekly quests and hope that it registers. Despite Georg (SEA)/Demolisher (GMS) having a poor spawnrate, the monster is coded as a boss monster and can be registered easily, alternatively, it also can be registered in Reina Strait as it shares the same name.
I have crossed out elite monsters, Lotus and Missile Android Red/Blue (SEA)/Salvoroid Red/Blue (GMS) and Remodeled Giant Android (SEA)/Modded Megaroid (GMS) for the purpose of collection (note that the three "regular" mobs that I've pointed out are very difficult to collect due to extremely low spawnrate. For information on collecting Lotus, see Section 9 below.
Total: 15 monsters
El Nath Page 1 (Recommended for 300/600)
Avoid Crimson Balrog, the elite Pixie, Papa Pixie, Ghost Pixie, and the three Chryse PQ mobs. For more information on Crimson Balrog, see Section 9 below. In GMS, you can register Papa Pixie via Mirror World (see point 4.2 above).
Total: 17 monsters.
El Nath Page 2 (Recommended for 300/600)
Avoid the elite white fang and ignore the bottom line as they are PQ mobs. Note that you'll need to hunt Separated Pepe and not regular Pepe for the for the Monster Collection. Separated Pepe only spawns after defeating Yeti & Pepe.
Total: 17 monsters
El Nath Page 3 (Recommended for 600)
Avoid Golden Bee, King Castle Golem, elite monsters, Prison Guard Rhino and Boar, Zakum summons and Chaos Zakum. Note that killing any difficulty of Von Leon will count towards the monster collection. Zakum (Easy and Normal shared limit) and Von Leon can be cleared once a day (shared across all difficulties).
Side note: This screenshot is taken in MSEA and as such, the image for Zakum looks different from the GMS version, this is an aesthetics difference and doesn't impact gameplay in any way.
Total: 15 monsters
Ludus Lake Page 1 (Recommended for 300/600)
Avoid the two elites, Rombot, the PQ mob (Dark Eye from Another Dimension) and Alishar. Note that Alishar can be obtained from Mirror World and Dojo. Rombot spawns in pairs in a hidden map off Eos Tower alongside (Yellow) Block Golems and King Block Golems.
Total: 19 monsters
Ludus Lake Page 2 (Recommended for 300/600)
Avoid the elite monster. Easy and Normal Papulatus have a shared daily limit of one entry per day while Chaos have a weekly clear limit of once per week. Note that defeating any difficulty of Papulatus will count towards Papulatus for monster collection. Alternatively, Papulatus can be obtained from Mirror World.
Total: 21 monsters
Ludus Lake Page 3 - Ellin Forest (Recommended for 300/600)
Avoid the elite and the PQ mobs including Poison Golem. Poison Golem can be obtain via Dojo or Monsterpark. The third line, Neon Bat and Peace Spirit are found in the Dimensional Library. The Poison Flower is obtained from the simple monsterbloom.
Total: 16 monsters (including Poison Flower)
Ludus Lake Page 4 - Fantasy Theme Park & Korean Folk Town (Recommended for 600)
Avoid the elites. Note that there are FOUR bosses in Fantasy Theme Park and it might take some time to collect all four.
Due to naming differences between the monsters in Ludibrium and the monsters in Malaysia, it is not possible to register most of the monsters using Malaysia map variants (eg: Ratacula required for collection is name as Ratatula in Malaysia) with the exception of Targa and Angry Targa (even then, it is recommended to farm the Ludibrium variants as they have unlimited entries)
Total: 19 monsters.
Ludas Lake Page 5 (Recommended for 600)
The top row contains the 3 Ludibrium monsters that were excluded from the monster collection when it was first released. All of the other monsters are from Omega Sector. Avoid the 2 elites and Wipe-O-Matic.
Wipe-O-Matic is summoned by Kawoong (SEA)/OMNI-CLN (GMS) and will "disappear" after a while if it is not killed. You can enter Kawoong once per day per character.
Similar to Edelstein Page 2, you'll have to hunt both regular and elite versions of certain monsters for Monster Collection.
Total: 16 monsters
Aqua Road - (Recommended for 600)
You might ask, why do I only recommend it for 600 monsters? The terrain is particularly annoying to navigate and with the addition of several new pages with monsters below Level 100, this page got bumped up from recommended for 300 to 600.
Avoid the elites. I did not include Goby House (aka Bombing Fish House) in the list as it is a low-spawning monster similar to Rombot, although it have a rather decent spawn rate (about 4-5 in Deep Sea Gorge 1 and Grave of a Wrecked Ship). Gobies will only spawn after a Goby House is "destroyed"/defeated.
Total: 21 monsters.
Nihal Desert Page 1 - Ariant (Recommended for 300/600)
Collect everything except the elite, ignore the bottom two rows as the fourth row consists of Pyramid PQ mobs and the bottom row consists of difficult to collect monsters and Hard Hilla. See section 6.13 above for a guide to collecting the bottom row monsters.
Total: 14 monsters
Nihal Desert Page 2 - Magatia (Recommended for 300/600)
Avoid the three elites, D. Roid, Frankenroid and Angry Frankenroid.
For a guide to collect Homun from Closed Laboratory (bottom row, middle monster), see Section 9 below
D. Roid is extremely rare spawning in pairs in Alcando Lab C-3, similar to Rombot above, it is classified as a regular monster with a low spawnrate.
Chimera can be accessed after completing Parwen's secret passage quest. Deet and Roid and Chimera also spawns inside the mystic gates.
Total: 15 monsters.
Mu Lung Sky Forest Page 1 (Recommended for 600)
Avoid the elite snake and Mu Gong, despite having three stars, Sage Cat is NOT an elite monster. Giant Bellflower spawns at Bellflower Valley (alternatively, you can register it via Mirror World or Polo's Castle Map)
Mu Gong spawns every 12 hours at Territory of the Wandering Bear, which can be quite challenging to find him especially when there are also other players trying to collect him.
Total: 18 monsters.
Mu Lung Sky Forest Page 2 (Recommended for 600)
Avoid the elite and Lord Pirate. You can enter Ravana twice a day after completing the Golden Temple questline, note that you will need a sunburst (obtained by combining 10 burning sunbursts) to battle Ravana.
Total: 16 monsters
Minar Forest Page 1 (Recommended for 600)
Master Harp, Master Hoblin and King Kentaurus can only be found in Mystic Gates. Master Birk spawns at Valley of the Antelope 2. The two-starred monsters are starforced variant monsters.
Total: 21 monsters
Minar Forest Page 2 (Recommended for 600)
Avoid the two elites and Blood Harp (see Section 9 below), you'll need to complete Stone Colossus questline to be able to battle Tarantulus, note that there is a limit of 10 entries a day.
Total: 17 monsters
Minar Forest Page 3 (Recommended for 600)
Avoid the entire Dragon Rider line and elite starforced Dark Wyvern. For more info on how to obtain Horntail and Chaos Horntail, refer to Section 6 above.
Total: 15 monsters
Minar Forest Page 4 - Kritas (Recommended for 600)
This is a straightforward page with no elites, bosses or low-spawning monsters.
Total: 18 monsters
Temple of Time Page 1 (Recommended for 600)
Avoid the two elites, Starforced Eye of Time, Chaos Pink Bean, Arkarium and his summons. Arkarium and Netherworld Monk can also be registered via Mihile's Arkarium quest where you'll have to defeat a weakened version of Arkarium a total of 6 times over a span of at least 6 days (you can still enter after you have completed the quest and you can enter as many times as you like).
Note that Normal Pink Bean have a daily entry limit of 1 entry per character and Chaos Pink Bean have a weekly clear limit of 1 time per week, in addition, there is a shared daily entry limit of 1 entry to both Normal and Chaos Pink Bean. The two statues can only be collected in Normal Pink Bean and not in Chaos Pink Bean.
Total: 18 monsters
Temple of Time Page 2 (Recommended for 600)
Avoid the elite monsters and collect everything else.
Total: 17 monsters
Temple of Time Page 3 (Recommended for 600)
For the purpose of collection as I've set the benchmark for bossing at Chaos Horntail/Normal Pink Bean, I have excluded Cygnus, Shinsoo and the commanders. You will need to collect starforced Knight C and Knight D instead of the regular version for Monster Collection. Ifrit can be collected while farming Advanced Knight B.
Please note that killing Monster Park variants of the knights and the commanders will not count as they are named differently
Total: 16 monsters
Grandis Page 1 (Recommended for 150/300/600)
See Section 9.1 below for details on the monsters circled in orange and green.
Total: 25 monsters.
Grandis Page 2 (Recommended for 300/600)
Avoid the elite reaper specter. In MSEA, you have to hunt for Hard Magnus, in GMS, you can hunt any variant of Magnus to collect "Magnus" for the monster collection.
Total: 21 monsters
Grandis Page 3 (Recommended for 300/600)
See Section 9.1 below for details on the monsters circled in orange and green.
Total: 23 monsters
Grandis Page 4 - Top 3 lines (Recommended for 150/300)
The top three lines is incredibly easy to register and is accessible to anyone with a warp drive (aka Teleport Rock). If you were unable to register them on your Ark while doing the questline, you can simply use the world warp drive from the Fairy Bros daily reward or from event shops to teleport a character to Verdel to register those monsters.
Total: 12 monsters
Grandis Page 4 - Bottom 2 lines (Recommended for 600)
The bottom two line contains monsters from Fox Valley. Avoid the elite.
Total: 9 monsters
Grandis Page 5 - Top 3 lines (Recommended for 150/300)
See Section 9.1 below for details on the monster circled in green.
Total: 14 monsters
Grandis Page 5 - Bottom 2 lines (Recommended for 600)
Avoid the two elite monsters
Total: 8 monsters
Grandis Page 6 (Recommended for 150/300/600)
See Section 9.1 below for details on the monsters circled in orange and green. This page is possibly the easiest for a cube chair as all the monsters here are Level 30 or below and there are no special/elite monsters.
Total: 19 monsters
Arcane River Page 1 (Recommended for 600)
Avoid the elites, Slurpy Tree can be obtained while doing the questline or Hungry Muto.
Total: 18 monsters
Arcane River Page 2 (Recommended for 600)
Avoid the two elites, Lucid and her two summons, note that Softened Cleaner (SEA)/Weakened Dreamkeeper (GMS) is not required for monster collection and you'll need to hunt the Cleaner/Dreamkeeper that spawns in the clocktower to collect it.
Total: 18 monsters
Arcane River Page 3 (Recommended for 600) - Arcana minimum Lv225, Moras minimum Lv230
Avoid the elite and the rarely spawning Spirit Remains/Spirit Debris. Corrupted Spirit of Harmony can be fought repeatedly after completing Arcana's questline.
Total: 20 monsters (11 from Arcana, 9 from Moras)
Arcane River Page 4 - Esfera minimum Lv235, Moonbridge minimum Lv245, Labyrinth of Suffering minimum Lv250
Avoid the elite, Will, Giant Monster Dusk/Gloom and Huge Golem.
Total: 21 monsters (9 from Esfera, 6 from Moonbridge and 6 from Labyrinth of Suffering)
Arcane River Page 5 - Labyrinth of Suffering minumum Lv250, Limen minimum Lv255
Avoid Heretic Hilla, Incarnation of Desire/Greed Echo, Djunkel and his summon, Blackheart Negative and Black Mage. Note that you do not have to fully clear Black Mage to register him as Black Mage's 2nd, 3rd and 4th form all have a chance to register him.
Total: 12 monsters (7 from Labyrinth, 5 from Limen)
Arcane River Page 6 (Recommended for 600)
Avoid the 3 elites. Kindly pay attention to the monster requirements as certain monsters will ask for a potent variant instead of a regular variant monster.
Total: 17 monsters
8. ELITE MONSTER COLLECTION GUIDE
Contents
8.1 What are elite monsters in monster collection?
8.2 Strategies to collect them
8.3 Tips for Elite Monster Farming
8.4 A List of Elite Monsters and Elite Bosses in Monster Collection
8.5 Bonus Section - To collect a Gassy Homunscullo
8.1 What are elite monsters in monster collection?
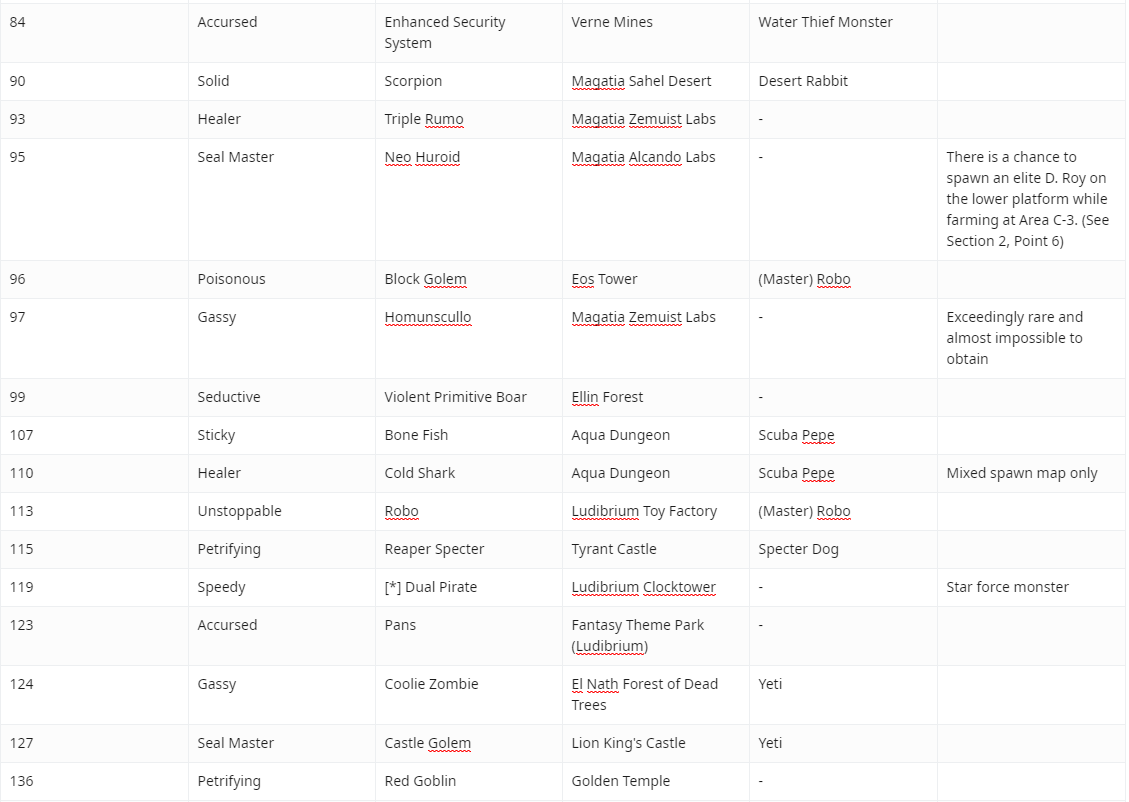
In monster collection, you'll notice certain (non-boss) monsters are marked with three stars, such as the example in the pictures below. These monsters (with the exception of Sage Cat) have a three-star difficulty. You'll notice that these monsters have a preflix in front of their name for example: Evasive Wild Boar and Strong Fire Boar as pictured below.
Note that Magic Resistant Commander Suspicious Seal (pictured below) and Poisonous Draining Archer Gobbler (KMS only as of now) are elite monsters with a 4 star difficulty. Despite that, it doesn't seem to affect the collect chance in any way as it behaves similarly to any other elite. However, due to its 4 star difficulty, it is restricted from being registered using Mystery Momons.
8.2. How do I collect elite monsters?
Elite monsters are extremely hard to collect due to their rarity as you need to spawn a specific elite and defeat the elite, just hoping that it will register. Sometimes you'll get lucky and register it on your first try, sometimes it can take a long time, Evasive Red Flower Serpent took me a record 6 tries to register. That said, there are two methods that I use to farm elites and some tips to speed up collection.
Method 1: Farm the specific elite using a character within the monster's level range:
Note that there is a maximum of 20 level difference between the level of the monster and the character level. For example, the highest level a character can get to spawn a Level 93 Triple Rumo elite is a Level 113 character.
For monsters in mixed maps, this is slightly more complicated as explained below in the spoiler.
Elite monsters can only spawn when the player is +20/-20 levels of the monster. But in the screenshot below, a Level 231 character is able to spawn a Level 210 Ewenana elite, how is that possible?
The explanation is as follows. As Lambnana (Level 211) is within 20 levels of the character, killing Lambnanas can trigger the spawn of elite monsters, bounty hunter portals and flame wolf portals. Killing Ewenanas on the other hand will NOT trigger the spawn of elite monsters, bounty hunter portals and flame wolf portals.
When an elite is spawned, the monster type (for the above screenshot, Ewenana or Lambnana) depends on the position where the player is standing while the elite spawn is triggered as an elite monster will spawn at a spawnpoint within close proximity of the player, thus, making it possible to spawn elite variants of monsters that exceed 20 levels of the player.
For the elite monster level calculation, this seems to be based on the average level of the monster in the map rounded down. As a result, elite Lambnanas (Level 211 monsters) appear as Level 210 elites when spawned in the shared map with Ewenanas.
In addition, elites will still spawn when there is a rune curse, making it possible to farm elites without levelling up, however, this method is extremely tedious. (Credits to u/squishypearls of Reddit for clarifying the maximum level range to spawn an elite.)
An elite champion will always spawn as the 5th, 10th and 15th elite in an elite boss cycle for maps Level 140 and above with the elite boss being the 20th.
Every 5th elite will always be an elite champion for maps below Level 140 and Cerenium maps (excluding theme dungeons with instanced spawns where elite champions and elite bosses will not spawn).
Method 2: Using Rune of Asteria (Darkness Rune):
8.3 Tips for Elite Monster Farming
8.3.1. Spawn an elite in the map, defeat it, change to the next channel.
8.3.2. Spawn a rune in the map, DO NOT USE the rune unless it is a darkness rune, change to the next channel until you spawn a Rune of Asteria (Darkness Rune) and use the rune to spawn three elites (ethics are questionable for this method as it would result in several maps "plagued" with cursed runes)
8.3.3. Stick around when you're aware an elite boss is going to spawn as two elites will spawn alongside the elite boss, this DOES NOT apply to maps with monsters below Level 140 as elite bosses will not spawn. However, elites spawning alongside the elite boss are exclusively yellow sword, meaning that certain elites will never appear alongside the elite boss. See the next point below, 8.3.4. for detailed information.
8.3.4. Not exactly a tip but certain elites are much more common compared to others. Magic resistant and strong are the most common while the rarest elite type required by Monster Collection is Magic Resistant Commander with a spawn probability of 1.68%. For the purpose of this guide, I will be using the weighted odds to estimate spawn probability.
For more details on spawn probability, click on the spoiler below.
Major thanks to Bready of MapleSEA discord for the information on the elite prefix assigned weights and to Ministriy of Monster Collection discord for the elite monster samples.
A total of 2129 elites were sampled in the table below as follows:
To read the table, I've arranged the prefixes alphabetically according to the SEA names. GMS elite prefix names that differ from SEA names are in red. For GMS users, please note that Draining is the SEA name for Debilitating elites. The last two columns represents the difference between the total% derived from the weighed and unweighted pools as compared to the sampled total%.
Each elite is assigned a prefix weight with either 1 or 4. There are two different variations of Strong and Magic Resistant elites sharing the same name, hence, the weight is doubled in the yellow sword pool. All Draining and Commander elite prefixes are assigned with a weight of 1 while normal elites are assigned with a weight of 4. (Note: Black Chains have two variations, both with a weight of 2).
Note that certain elites will only exclusively spawn in one sword colour pool while others will appear in two or all three pool colours. This is the reason why Gassy is exclusively an orange sword elite.
I've calculated the odds to spawn an elite using weighted (assuming each sword colour have an equal 33% chance to appear) and unweighted (where I divide the total weight over three colours by 179 which is the sum of the total elite pool weights combined).
The elite monsters sampled by Ministriy closely matches with the elite prefix weighted odds with a majority of the weighted samples falling in between +/- 0.3% of the expected weighted odds.
8.3.5. Occasionally you might see a darkness rune in a map left by another player while channel surfing, you can use it to spawn three elites. Note that for that particular channel, no runes will spawn for the next 15 minutes
8.3.6. Study the map spawn layout, this is quite useful in mixed maps so that you do not spawn three of an elite monster that you do not want from a Darkness Rune (aka "wasting" a rune), an example is Truffet, That Day 2 below:
Based on the picture above, there are a few platforms that I colour coded. The green platforms guarantees to spawn a Hammerer elite while the red platforms could either spawn a Royal Guard or Hammerer depending on where the player spawns, keeping in mind that when an elite is spawned, any spawnpoint that is close to the player could spawn an elite.
All the other platforms (with the exception of the two platforms that do not spawn any monsters on the far left not coloured WILL spawn a Royal Guard) This is because when spawning elites (be it normally or via a rune), they only spawn on the nearest spawnpoints where regular monsters spawn. In this case for the two platforms on the far left, the nearest spawn point is at the green platforms.
As such, I've noticed the layout of the map and lured all of the monsters to the far left before killing them in order to greatly increase my chance to spawn a Seal Master Hammerer. This is because on the leftmost side of the map, the nearest designated spawnpoint from the character is a Hammerer.
This method also works for other maps (eg: Ice Valley 1 would spawn either elite Hector or White Fang depending on the platform). However, this method is not 100% guaranteed to work as it requires precision in most cases and many of these maps have spawnpoints of different mob types close to one another. However, there is one trick that could be useful in the next section.
For monsters with a "pure map" with an occasional spawning monster (Neo Huroid map and Alloy Generoid A map), there is a chance to spawn an elite D. Roy and Remodeled Giant Android respectively while farming for elites if an elite appears when your character is standing within proximity of their designated spawnpoints. The rate is quite low as they do not have many (designated) spawn points but it can be annoying at times to spawn an elite of a monster that you do not need.
8.3.7. You can "adjust" the location the monster spawns from a Rune of Asteria. Credits to FSXerath for the information on this.
For this to happen, you'll need to use a job that can teleport or move to your desired spot to spawn the elite monster type that you wanted by pressing NPC chat and teleporting at the same time. I've provided two examples below using teleport.
As elite monsters spawns on spawnpoints that are within proximity to the character's location, you can make runes spawn elites on another platform using the method below.
A rune of Asteria appears on a platform that normally spawns Hectors. This rune is not really useful since the nearest designated spawnpoints will only spawn Hectors. It is possible to make the rune spawn a White Fang elite as seen in the next screenshot:
How was that possible? I used a Kanna to do this trick where I teleported to the next platform while pressing the NPC chat key. When the rune is activated, the elite monsters that appears from the rune will appear near my character which results in three White Fang elites appearing instead of Hector elites.
If I were to activate the rune on the platform with the Mages, there is a very high chance that I might end up spawning three of the Mages instead of Hammerers.
As such, I teleported to the platform below that spawns Hammerers before activating the rune, thus allowing me to spawn three Hammerers instead.
Three Hammerer elites spawned (notice the rune activation buff on the top right of the screenshot)
Important Note: This method is not guaranteed to spawn the elite you want, even if you stand at the correct spot. This is due to the randomness of the spawnpoints where the game picks three random spawnpoints closest to the character. See below for a failed example.
A Coffee Machine spawns near the rune, however, there are designated spawnpoints for Jelly Juices that are closer to the rune.
Activating the rune after marking the spot where the coffee machine spawns with a gold meso coin
Spawning three Jelly Juices instead of any Coffee Machine despite the Coffee Machine spawnpoint being the closest to the character when the rune was activated.
8.3.8. Take advantage of Sunday Maple benefits as occasionally, Sunday Maple may have a special event where TWO elites spawn instead of one, this can help to speed up the collection process as you'll have a slightly higher chance to spawn the elite you want (assuming that the spawn point is the "correct" spawnpoint as mentioned in 8.3.6. for the case of maps with mixed spawn). In the picture below, I've used Sunday Maple (double elites + 100% additional collection chance) to help me collect Healer Cold Shark.
8.4 A List of Elite Monsters and Elite Bosses in Monster Collection
Here is a list of elite monsters sorted by level, note that I'm using MapleSEA's monster names as indicated in green. The prefix required for each elite monster is in bold. For monsters where GMS prefixes and monster names that are different from MSEA names, the prefixes and names will be in blue.
Note that during certain events such as Halloween, elite monsters may take the appearance of an event monster, but it will still retain the elite monster's name (eg: An elite that looks like a Frankenbalrog but is named as Evasive Wild Boar) and as such, you can still collect the elite as it is registered on a same-name basis as covered earlier.
Information is correct as of MSEA V218
Monster Level: 30-59
SEA: Healer High-Class Magic Book
GMS: Healer Raging Tome
Found in: Elliniel Fairy Academy
Required for the Orange Mushroom Cube Chair
Notes: No runes spawn in the maps that this monster spawns in, this monster's level is variable and scaled up to Level 59, for more information, see Point 8.6 below
Monster Level 30-59:
SEA: Strong Purple Clam Slime
GMS: Beefy Violet Clam Slime
Found in: Gold Beach
Required for the Orange Mushroom Cube Chair
Notes: No runes spawn in the maps that this monster spawns in, this monster's level is variable and scaled up to Level 59, for more information, see Point 8.6 below
Monster Level 30-59:
Petrifying Starfish Octopus Slime
Found in: Gold Beach
Required for the Orange Mushroom Cube Chair
Notes: No runes spawn in the maps that this monster spawns in, this monster's level is variable and scaled up to Level 59, for more information, see Point 8.6 below
Monster Level 30-59:
SEA: Magic Resistant Commander Suspicious Seal
GMS: Magic-Resistant Commanding Possibly-Evil Seal
Found in: Reina Strait - Suspicious Underwater Cave
Required for the Tino Cube Chair
Notes: No runes spawn in the maps that this monster spawns in, this monster's level is variable and scaled up to Level 59, for more information, see Point 8.6 below
This monster cannot be registered using a Momon as it is a four-star monster, for more information, see Section 13 below
Monster Level 30-59:
SEA: Unstoppable Straw Ball
GMS: Unstoppable Hay Bundle
Found in: Secret Forest Elludin
Required for the Earthenware Rabbit Cube Chair
Notes: No runes spawn in the maps that this monster spawns in, this monster's level is variable and scaled up to Level 59, for more information, see Point 8.6 below
Monster Level 55:
Evasive Wild Boar
Found in: Perion Burning Land
Notes: Mixed spawn map only
Monster Level 58:
SEA: Strong Fire Boar
GMS: Beefy Fire Boar
Found in: Perion Burning Land
Monster Level 60:
Sticky Wooden Mask
Found in: Perion Excavation Site
Monster Level 60:
SEA: Strong Mushroom Chandelier
GMS: Beefy Mushroom Chandelier
Found in: Mushroom Castle
Monster Level 64:
Petrifying Solemn Viking
Found in: Mushroom Castle
Monster Level 70:
Petrifying Taurospear
Found in: Sleepywood
Monster Level 74:
SEA: Chaotic Luster Pixie
GMS: Befuddling Luster Pixie
Found in: Orbis Cloud Park 5 and 6
Monster Level 81:
SEA: Dark White Fang
GMS: Shadowy White Fang
Found in: El Nath Ice Valley
Note: This monster is required in order to obtain the Ice Golem Momon
Monster Level 84:
Poisonous Enhanced Security System
Found in: Verne Mines
Required for the Water Thief Monster Cube Chair
Monster Level 90:
Undead Scorpion
Found in: Magatia Sahel Desert
Required for the Desert Rabbit Cube Chair
Monster Level 93:
Healer Triple Rumo
Found in: Magatia Zemuist Lab 103
Monster Level 95:
Seal Master Neo Huroid
Found in: Magatia Alcando Labs Areas C2 and C3
Note: There is a chance to spawn an elite D. Roy on the lower platform while farming at Area C-3. (See Section 8.3.6)
Monster Level 96:
Poisonous Block Golem
Found in: Eos Tower
Required for the (Master) Robo Cube Chair
Monster Level 97:
Gassy Homunscullo
Found in: Magatia Zemuist Lab 202
Important note: For detailed information on this infamous monster, check out Section 8.5
Monster Level 99:
Evasive Violent Primitive Boar
Found in: Ellin Forest
Monster Level 107:
Sticky Bone Fish
Found in: Aqua Dungeon Deep Sea Gorges 1 and 2
Required for the Scuba Pepe Cube Chair
Monster Level 110:
Healer Cold Shark
Found in: Aqua Dungeon Grave of a Wrecked Ship
Required for the Scuba Pepe Cube Chair
Notes: Mixed spawn map only
Monster Level 113:
Unstoppable Robo
Found in: Ludibrium Toy Factory
Required for the (Master) Robo Cube Chair
Monster Level 115:
Petrifying Reaper Specter
Found in: Tyrant Castle
Required for the Specter Dog Cube Chair
Note: While a Level 30 variant of Reaper Specter spawns in Verdel's Ravaged Eastern Bases 2 (mixed spawn) and 3, the spawnrate and map layout there is extremely atrocious and as such, it is strongly discouraged to use that map to farm the elite.
Monster Level 119:
SEA: Fragile [*] Dual Pirate
GMS: Fragile [*] Dual Ghost Pirate
Found in: Ludibrium Clocktower
Notes: This is a star force monster
Monster Level 123:
SEA: Potion Hater Pans
GMS: Dry Jellybus
Found in: Fantasy Theme Park (Ludibrium)
Monster Level 124:
Gassy Coolie Zombie
Found in: El Nath Forest of Dead Trees
Required for the Yeti Cube Chair
Monster Level 127:
Seal Master Castle Golem
Found in: Lion King's Castle
Required for the Yeti Cube Chair
Monster Level 134:
Fragile [*] Garden Golem
Found in: Lion King's Castle Rose Garden
Required for the Zakum Cube Chair
Notes: This is a star force monster
Monster Level 136:
Petrifying Red Goblin
Found in: Golden Temple
Monster Level 136:
SEA: Dark Dangerous Incense Rabbit
GMS: Shadowy Flared Chargin' Sprout
Found in: Partem
Required for the Earthenware Rabbit Cube Chair
Monster Level 137:
Evasive Red Flower Serpent
Found in: Mu Lung Sky Forest
Required for the Grizzly Cube Chair
Monster Level 139:
SEA: Chaotic Green King Goblin
GMS: Befuddling Green King Goblin
Found in: Korean Folk Town
Notes: Mixed spawn map only
Monster Level 141:
SEA: Potion Hater [*] Dark Wyvern
GMS: Dry [*] Dark Wyvern
Found in: Leafre Dragon Canyon
Required for the Birk Cube Chair
Notes: This is a star force monster
Monster Level 142:
SEA: Gassy Dangerous Ruins Offender B
GMS: Gassy Frenzied Ruins Sentinel
Found in: Partem
Required for the Earthenware Rabbit Cube Chair
Monster Level 149:
SEA: Evasive Steaming Coffee Machine
GMS: Evasive Enraged Espresso Machine
Found in: Kerning Tower 2nd Floor
Notes: Mixed spawn map only
Monster Level 149:
SEA: Knock Out Chief Qualm Guardian
GMS: Overwhelming Chief Qualm Guardian
Found in: Temple of Time - Regrets Zone
Notes: Mixed spawn map only
Monster Level 154:
SEA: Strong Chief Oblivion Guardian
GMS: Beefy Chief Oblivion Guardian
Found: Temple of Time - Oblivion Zone
Monster Level 158:
Poisonous Poison Hornet
Found in: Colossus - Bee Habitat
Notes: Mixed spawn map only
Monster Level 163:
SEA: Chaotic Spirit of Fallen Stone
GMS: Befuddling Corrupted Rock Spirit
Found in: Colossus - Inside Rock Giant's Body
Monster Level 168:
Undead Mutant Ribbon Pig
Found in: Future Henesys
Monster Level 178:
SEA: Undead [*] New Gray White
GMS: Undead [*] Gray Commuter Saucer
Found in: Omega Sector
Required for the Kawoong Cube Chair
Notes: This is a star force monster
Monster Level 179:
SEA: Fragile Black Drone
GMS: Fragile Black Robosaucer
Found in: Omega Sector
Required for the Kawoong Cube Chair
Monster Level 179:
Unstoppable Dangerous Nutria
Found in: Savage Terminal
Required for the Back Alley Cat Cube Chair
Monster Level 184:
SEA: Poisonous Draining Archer Gobbler
GMS: Poisonous Debilitating Spine Glooger
Found in: Savage Terminal
Required for the Back Alley Cat Cube Chair
Notes: This monster cannot be registered using a Momon as it is a four-star monster, for more information, see Section 13 below
Monster Level 192:
SEA: Potion Hater Transformed Axe Stump
GMS: Dry Swollen Axe Stump
Found in: Future Perion
Monster Level 195:
SEA: Gassy Puffy Squirrel
GMS: Gassy Vicious Squirrel
Found in: Fox Valley
Required for the Sky Guardian Cube Chair
Monster Level 198:
Seal Master Ancient Mixed Golem
Found in: Future Perion
Monster Level 202:
SEA: Chaotic Remodeled Failed Android
GMS: Befuddling Modded Broken Android
Found in: Scrapyard
Monster Level 205:
Evasive Monto
Found in: Reverse City Subway
Required for the Kumpider Cube Chair
Monster Level 207:
SEA: Dark Erdas of Rest
GMS: Shadowy Tranquil Erda
Found in: Road to Extinction Cave of Rest
Required for the Ripe Wolfroot Cube Chair
Monster Level 209:
SEA: Sticky Annihiliation T-Drone Type B
GMS: Sticky Exterminator T-Drone Model B
Found in: Reverse City M Tower
Required for the Kumpider Cube Chair
Monster Level 213:
SEA: Poisonous Ripe Wolfroot
GMS: Poisonous Ripe Wolfruit
Found in: Chew Chew Island Slurp Forest
Required for the Ripe Wolfroot Cube Chair
Notes: Mixed spawn map only
Monster Level 215:
SEA: Unstoppable Fallen Demon Enhanced Axeman
GMS: Unstoppable Dark Demon Axemaster
Found in: Corrupted World Tree
Required for the Blood Stirge Cube Chair
Notes: Mixed spawn map only
Monster Level 218:
SEA: Knock Out Steel Generoid B
GMS: Overwhelming Steel Xeneoroid EX
Found in: Scrapyard
Notes: Mixed spawn map only
Monster Level 219:
SEA: Potion Hater Alloy Generoid A
GMS: Dry Alloy Xeneoroid DX
Found in: Scrapyard
Notes: There is a chance to spawn an elite Remodeled Giant Android on certain platforms while farming at Black Heaven Interior Mazes 6 & 7 (See Section 8.3.6)
Monster Level 219:
SEA: Fragile Chief Crilla
GMS: Fragile Patriarch Chilla
Found in: Chew Chew Island Mt Whale
Monster Level 220:
SEA: Healer Powerful Stonpy
GMS: Healer Potent Stonepy
Found in: Yum Yum Island Hidden Illiyard Moor
Required for the Kumpider Cube Chair
Notes: Mixed spawn map only
Monster Level 225:
SEA: Unstoppable Dancing Red Heels
GMS: Unstoppable Red Dancing Shoes
Found in: Lacheln Ballroom
Monster Level 234:
SEA: Dark Spirit of Lightning Cloud
GMS: Shadowy Thunder Cloud Spirit
Found in: Arcana
Required for the Nameless Cat Cube Chair
Monster Level 243:
SEA: Seal Master Hammerer, Caught in Ritual
GMS: Seal Master Thralled Warhammer Knight
Found in: Moras Truffet that Day
Required for the Nameless Cat Cube Chair
Notes: Mixed spawn map only
Monster Level 249:
SEA: Knock Out Dark Executor
GMS: Overwhelming Dark Executor
Found in: Esfera Mirror Light Shrine
Monster Level 269:
SEA: Magic Resistant Black Sun Monk
GMS: Magic Resistant Ebonstar Magician
Found in: Fallen Cernium - Burning Royal Library
Required for the Chosen Serene Cube Chair
Monster Level 274:
SEA: Strong Masterless Watchdog
GMS: Beefy Houndbot
Found in: Hotel Arcs - Train With No Destination
Required for the Guardian Kalos Cube Chair
As each elite boss have two prefixes to match, the first prefix is bolded, while the second prefix is in italics.
Arcane River Elite Bosses:
SEA: Fragile Chaotic Black Knight Mokadin
GMS: Fragile Befuddling Black Knight
SEA: Evasive Magic Resistant Crazy Mage Kariaine
GMS: Evasive Magic Resistant Mad Mage
SEA: Transformative Black Chains Charge Type CQ57
GMS: Master of Disguise Black Chains Rampant Cyborg
SEA: Healer Strong Headhunter July
GMS: Healer Beefy Vicious Hunter
SEA: Seal Master Undead Fighter Plaid
GMS: Seal Master Undead Bad Brawler
Cernium Elite Boss:
SEA: Evasive Transformative Great Flame Spirit
GMS: Evasive Master of Disguise Flaming Great Spirit
Burning Cernium Elite Boss:
SEA: Strong Undead Lef Commander
GMS: Beefy Undead Flora Commander
Hotel Arcs Elite Boss:
SEA: Petrifying Seal Master Wilderness Sheriff
GMS: Petrifying Seal Master Sheriff of Wastes
Odium Elite Boss:
SEA: Chaotic Petrifying Odium Guardian
GMS: Befuddling Petrifying Odium's Guard
8.5 Bonus Section - To collect a Gassy Homunscullo
Click on the spoiler button below for information about this infamous elite.
While the other mixed spawn map elites including the Cold Shark and the Coffee Machine can be reasonably obtained while training mules at the maps that spawn those monsters despite their limited spawn by spawnpoints, the Gassy Homunscullo requires extreme precision and lots of luck to be collected.
You might be wondering, why is this particular elite so difficult to collect, here are the reasons:
1. Homunscullos only have two designated spawnpoints in Lab 202, as covered in Section 8.3.6 earlier, the positioning of where you stand will affect the monster type that spawns, as such, if you were to hunt this elite like any other elite, you'll most likely end up spawning a Homunculus elite.
Note that you can spawn more than one elite Homunscullo from a Rune of Darkness if the position is "correct" as seen in the picture below:
2. Gassy is a prefix that is among the rarer ones with a spawn probability of 2.38%, exclusively appearing only as an orange sword elite (see: Section 8.3 above), this combined with Point #1 above makes the Gassy Homunscullo an extremely rare elite variant.
3. The maximum level to farm the map reliably is Level 115 due to the fact that an overwhelming majority of the monsters that spawns in the map are Homunculus. Due to this low upper level limit of Level 115 combined with the extreme rarity of said elite, it is likely that you might overlevel your characters attempting to collect this monster.
In Point 8.1 above, I've mentioned about how elites only spawn within 20 levels of the character, while it is possible to trigger an elite monster to spawn naturally by killing a Homunscullo using a Level 116-117 character, the elite monster type still depends on the position when the monster is killed, making it an extremely impractical method to use a character above Level 115 (specifically, Level 116-117) to farm Homunscullo elites by triggering an elite monster to spawn.
Note that regular non-elite Homunscullos are Level 97 monsters, however, this doesn't seem to affect the average mob level of the map which is Level 95.
The two images below indicate the spawnpoints of Homunscullo as circled in green, note that elite Homunscullos can still spawn on these spawnpoints even when regular Homunscullo is on spawn cooldown.
Spawnpoint #1 (in-between the chalkboard and the ladder)
Spawnpoint #2: The right of the platform with a chalkboard
I spawned and collected my Gassy Homunscullo by luring Homunculus to spawnpoint #2 (near the portal). When the Homunculus are attacking me as I stood on top of the chalkboard platform waiting for the mobs to approach me, I'll kill the Homunculus when they are directly below me and hope that killing the mobs will trigger an elite Homunscullo to spawn.
The two pictures below illustrates how I spawned an Elite Homunscullo by killing monsters within the level range, the blue rectangle indicated where I stood, the yellow circle indicates the spawnpoint of Homunscullos.
NOTE: This method is NOT 100% guaranteed to work but I felt that this is the most consistent and reliable method to spawn a Homunscullo elite, occasionally, you might trigger a Homunculus to spawn instead even though you're standing at the "correct" position as elites will spawn from a random spawnpoint that is of close proximity to the player's location, precision is important here as if you were to stand to your left, you might trigger the Homunculus spawnpoint which is located to the left of the stairs.
8.6 Guide to collecting elites in instanced theme dungeons
Specifically: Reina Strait, Gold Beach, Elludin and Elliniel Fairy Academy
Click on the spoiler button below for more information.
Unlike other elites, elite monsters that spawns in those theme dungeons have a very specific formula for them to appear. This makes it much easier (or harder, depending on whether you find the lack of runes a disadvantage) to spawn them.
In addition, the maximum level to spawn an elite in these instanced theme dungeons is player level 79 as they scale up to monster level 59 and all monsters in the dungeon can only be seen by the player themselves, meaning you can't ask a friend who is within the level range to help to spawn the correct elite prefix for you. (TLDR: No sharing of monsters and elites)
The criteria to spawn an elite in any of those dungeons, such as a Raging Tome elite is:
1. Upon entering the map, the elite timer will start counting down from 180 seconds (3 minutes)
2. You need to kill at least 100 monsters for the elite the spawn
3. Changing channels or leaving the map (also, getting disconnected, going to the cash shop etc, basically anything that causes you to leave the map) will cause the timer to restart and spawn count to reset to 0
My strategy here would be to enter the map and open battle statistics and start killing 100 monsters. Upon reaching the 3 minute mark, kill one more monster and an elite will spawn. Note that the elite will only spawn the moment a spawnpoint is freed up (aka killing a monster).
If you did not kill 100 monsters after 180 seconds upon entering the map, the elite monster will appear the moment a total of 100 monsters are killed.
In the screenshot below, I casually hunted without counting (due to not having Battle Statistics counting total monster kill display at the point it was taken), slightly after the 3 minute mark, the elite Raging Tome (High-class magic book) spawned. In the screenshot below, the elite was registered at 116 combo, after farming in the map for slightly longer than three minutes.
9. Guide to Collecting Certain Rare and Specific Monsters
Formerly known as List of Known Workarounds for Monster Collection
Contents:
9.0 Introduction
9.1 Monsters that can only be Collected using a Specific Character
9.2 Monsters that can only be Collected during a Specific Quest
9.3 Notable Monsters with Workarounds
9.4 Other Notable Monsters
9.0 Introduction:
As mentioned in earlier sections, there are certain monsters that can be collected using workarounds while others require you to complete a specific questline to be able to obtain them. In the list below in the table of contents for Section 9, I'll be covering certain monsters that are relatively difficult to obtain and/or requires a specific method to register them. Note that I'll not cover in detail on Mirror World workarounds as they are covered in Point 4.2 above.
Feel free to submit workaround suggestions, however, the following will not be accepted due to reasons as explained below:
9.0.1. The target monster is a commonly-spawning low-levelled monster, the workaround monster is a high-levelled monster, this uses the same-name basis to register the target monster:
Example: Dark Axe Stump can be registered from Korean Folk Town, while this workaround is acceptable, it is actually easier to register the Perion variant due to its level.
Example 2 (MSEA): Freezer the fire extinguisher from CBD shares the exact same name as Freezer the seal from Aqua Road, while this workaround is also acceptable, I strongly recommend registering it through Aqua Road as you'll still have to register the other Aqua Road monsters as well. (See image below)
9.0.2. The target monster is a commonly-spawning high-levelled monster, the workaround monster is a low-levelled monster that spawns in a special map that is not commonly accessible, this uses the same-name basis to register the target monster:
Example: A lower-levelled variant of Hogul (Level 60) can be farmed inside the Kenta Tamable Monster map, however, to access that map, you'll need to spend 20 million mesos as part of Kenta's Hog quest and do some other quests which includes protecting the hog. While this workaround could be useful if you really want the Hog mount for your adventurer, a more straightforward way would be to farm Hogul (Level 135) normally at Korean Folk Town for two reasons:
1. The amount of time (and mesos) to do the hog quest with the intention to register Hogul would be more time consuming as compared to farming Hogul normally which can be done while training Union/Legion mules, killing two birds with one stone
2. Don't forget that there are also other monsters from Korean Folk Town that needs to be registered for the collection, so it is best to do them together as a set
9.1 Monsters that can only be Collected using a Specific Character
Certain monsters under the Grandis pages requires the player to collect them using a specific character. Some of these can only be collected while doing a specific quest.
9.1.1 Nefarious Monks and Heretic Monks (Angelic Buster's quest mobs)
These monsters can be collected with an Angelic Buster. Unlike many of the other monsters in this sub-section, you can still access these monsters even after you have completed the quest. Click on the spoiler below to learn more on these monsters.
Nefarious Monk monsters:
To find Nefarious Monks, press up at this hidden portal in East Pantheon Forest (Kaloong map).
Inside the Suspicious Temple, you'll be able to encounter the Nefarious Monks, each of the monk variants have their own map.
Heretic Monk monsters:
To find Heretic Monks, press up at this hidden portal in Orange Forest (Limestone Tokka map).
Inside the Heretic Temple, you'll be able to encounter the Heretic Monks, each of the monk variants have their own map.
9.1.2 Fox Point Village Monsters (Eunwol/Shade's quest mobs) (Top 2 rows of Grandis Page 1)
These monsters can only be collected with Eunwol/Shade during their first job. If Eunwol is to leave after second job advancement, they can never return to Fox Point Village
9.1.3 Asylum Monsters (Illium's quest mobs) (Top 2 rows of Grandis Page 3)
These monsters can only be collected with Illium during their first job, similar to the case of Eunwol above, if Illium completes their second job advancement, they can never return to Asylum.
In addition, Dark Obsidian and Corrupt Practice Bot (pictured below) can only be registered during a specific quest unlike the other monsters where you can kill them without any quest requirements.
9.1.4 Mr Hazard's Underling A (Cadena's quest mob)
Mr Hazard's Underling A (SEA)/Hazard's Vile Crony (GMS) can only be registered in Cadena's questline which gives you a few opportunities to defeat the monster. Once Cadena completes the questline, this monster is no longer accessible.
It is recommended that you use the very first quest to farm Mr Hazard Underling A by forfeiting the quest upon entering the questroom that requires you to defeat 30 of these guys and keep farming until it gets registered.
9.1.5 Lara Quest Mobs
There are two sets of monsters that must be collected using Lara, the top row contains three monsters that requires the player to create a new Lara to collect them.
Top row monsters include:
Tough Hyuk
Swaying Myung
Relishing Yeol
To collect those three monsters, you'll need to create a new Lara and sit through the tutorial cutscenes until you enter this map where you are required to kill 10 monsters (of any kind) to complete.
In the event you did not register all three monsters and killed 10 monsters, you can forfeit the quest after killing 10 monsters as seen in the screenshot below and try again.
What makes the three mobs annoying is that Tough Hyuk have a spawn ratio of 2 as compared to the other two with a ratio of 1. This meant that on average, Tough Hyuk would register earlier.
As you are only allowed to kill 10 monsters before you are kicked out of the map, you will need to do this multiple times (thankfully, they cap at 100 kills for a guaranteed register as they are Level 10) to collect all three of them.
The following four monsters can only be accessed by Lara. As you can still enter the maps even after completing Lara's storyline, it is easy to complete.
9.1.6 Kaine Quest Mobs
The following four monsters can only be obtained by Kaine. As you can still collect the monsters inside the building even after completing the quest, these monsters are easy to collect.
9.1.7 Monster Song (Ho Young's quest mob)
Monster Song (Pine Nut) appears in Ho Young's tutorial. You'll need to create a new Ho Young in order to collect it. As long as you do not turn in the quest, you can farm the monster indefinitely until it registers (the mob caps at 100 kills for a guarantee register as it is Level 3).
9.2 Monsters that can only be Collected during a Specific Quest
These monsters can only be registered while doing a specific quest, as such, my personal method is to always forfeit the quest while doing them and then try again until the monster is registered. Note that Viking Squad is covered in Section 5 above.
9.2.1 Homun of Closed Laboratory
To access this monster, you'll need to complete quests pertaining to Zemuist NPCs. Here is a brief summary of quests needed to be completed:
1. Talk to Broker Han, complete the Zemuist cape quest, this requires you to drop the water bottle etc to create a tree branch at Carson's map
2. Talk to Beldin after obtaining the cape and collect 50 Flame of the Desert etcs
3. Talk to Beldin after completing the previous quest and kill 200 Reinforced Mithril Mutaes
4. Talk to Beldin after completing the previous quest, the quest you'll receive involves you walking into a dark room to retrieve a scroll
After completing the quests above, you'll receive this quest from Carson, this quest below will require you to enter the Closed Laboratory to kill special Homuns to collect an etc. After accepting the quest, click on the option that says "I wish to go to the closed laboratory"
In the closed laboratory, you'll find Homun of Closed Laboratory (Level 71 mobs), you'll be required to kill these for a light controlling device etc.
Note that all the Homuns will automatically be killed if you drop a light controlling device at the platform where my Pink Bean is standing (this includes if a Homun is killed and the etc is dropped at the platform), if you accidentally triggered the "kill switch" for the Homuns (by accidentally dropping the purple gem etc on the book), you can try again by dropping the depleted light control device.
9.2.2 Master Red Nirg
Master Red Nirg is fought at the end of the Crimsonheart Castle questline. To reach him, you'll be required to complete a series of quests that requires you to kill a set number of monsters until you receive a quest that asks you to investigate the door at the bottom right, this is after you have evacuated all 12 NPCs trapped in the castle.
Upon killing him, you do not need to forfeit the quest to be able to fight him again, however, completing the quest by clicking the book on your character's head will prevent you from killing him.
When the pop-up below appears, you can click yes to leave the map.
If you are to re-enter the map after leaving and defeating Red Nirg, the quest will automatically reset and be deemed as incomplete, this means that you can repeatedly kill him until he registers. Note that you'll need to have the quest to kill Red Nirg to be able to access the map.
9.2.3 Giant Monster of the Ruins (SEA)/Blazin' Brazier (GMS)
Similar to Master Red Nirg above, if you do not collect it, you'll have to forfeit the quest and try again. However, you can only forfeit the quest after the boss is killed and you've been teleported to a map with the NPCs as seen in the screenshot below.
Forfeit the quest if you did not manage to register the boss. You'll notice that there are no offering on the altar such as in the screenshot below. If you are to receive a new quest and enter the quest map when the altar is empty, the game will glitch and the only way to fix it is to completely exit the game as there are no exit buttons during the cutscene. As such, you'll need to either change channel or exit the map and re-enter to ensure that the offerings on the altar are there.
Only accept the quest when the offerings are on the table as seen in the screenshot below
9.3 Notable Monsters with Workarounds
These monsters here have workarounds that are useful to help the player to collect certain rare and hard to collect monsters.
Bounty Hunter Portal monsters have been moved to Section 12.3
9.3.1 Monsterpark
Note: See Section 9.4 below for D. Roy
There are four bosses that you must collect via Monsterpark, they are:
Guard Captain, Caught in Ritual (Thralled General)
Chaos Executor (Executioner of Chaos)
Adoratio
Henchman of Total Darkness (Servant of Darkness)
In addition, you can register two party quest bosses in Monster Park - you will need a Level 105 to 139 character in order to access the dungeons that these bosses appear in:
Poison Golem from Ellin Forest
Lord Pirate from Herb Town
To farm the above monsters, upon defeating the boss, click on Spiggelmann to end your run without deducting your completion count, repeat this process until you register the monster required. Also, you can register D. Roy through Monster Park using the same method.
9.3.2 Crimson Balrog
Due to Crimson Balrog no longer spawning on the ship to Victoria and Orbis, players will need to rely on other methods to register this monster as follows:
A Crimson Balrog may be summoned by Balrog's RIGHT hand (left side of the screen from the player's point of view) when it's HP is depleted to a certain point
You can still find Crimson Balrog in Mu Lung Dojo (specifically, Floor 15)
A Crimson Balrog spawn when doing the Charm Level 80 quest in a special map, as such, you can continue farming Crimson Balrogs by not picking up the ETC item that it drops from the charm quest. Credits to PirateIzzy for this workaround method.
9.3.3 Story Mode Bosses - Lotus, Damien and Lucid
Lotus and Damien
Lotus and
Damien
Lotus can be registered from Black Heaven storyline. A tip is to defeat Lotus' phase 2 and exit and repeat until you've registered Lotus. Note that Lotus phase 2 and 3 shares the same name, as such, you can just repeatedly farm phase 2.
Damien can be registered from the Fallen World Tree storyline, unlike Lotus, Damien only have one form which means if you do not register him, you'll have to re-do act 4 again for a chance to register him.
Lucid and Nightmare Golem
Lucid and
Nightmare Golem
Lucid and Nightmare Golem can be registered through story mode Lucid (minimum Level 220), as long as you DO NOT turn in the quest, you can fight story mode Lucid as many times as you like, however, please take note that you'll need to complete story mode Lucid before you can proceed to Arcana.
Alternatively, upon defeating story mode Lucid (the second phase), leave the party during the 10 second period after Lucid is defeated, the run will be counted as not completed and you can try again.
9.3.4 Fallen Warrior (Limen Storyline)
The Fallen Warrior (Corrupted Warrior in GMS) can be collected using Limen's Storyline as seen in the screenshot below.
IMPORTANT NOTE: As of MSEA V218, this workaround is no longer recommended as if you use Limen storyline Djunkel to farm elite bosses, you can also collect Fallen Warrior at the same time as it will take a very long time to collect all five elite bosses. This section will be removed once the guide for farming Djunkel's Elite Boss is added.
![[IMG]](https://i.imgur.com/QMwWSWT.png)
The storyline quest consists of three waves of 50 Fallen Warriors. Every time 50 are killed, the player would have to face an elite boss in this sequential order:
Map 1: Kill 50 Fallen Warrior, encounters Fighter Plaid (Bad Brawler)
Map 2: Kill 50 Fallen Warrior, encounters Crazy Mage Kariaine
Map 3: Kill 50 Fallen Warrior, encounters Black Knight Mokdin
The method I used was to get to Map 3, kill 50 Fallen Warriors and leave before even attacking Black Knight Mokadin, this allowed me to keep on trying, killing 150 Fallen Warriors per round until I registered it.
9.3.5 Prison Guard Boar and Rhino
This section is submitted by reddit user u/RobinLionHeart as quoted below:
Reddit user u/Retredre have also suggested an alternative method to register those two monsters using Winter Bard (Dimension Library Book 4). I've did a test run on the method:
You'll encounter the Boars and Rhinos twice, the first time is during a stage based quest where the Boars and Rhinos spawns in their own map in Stage 3 and 4 (final stage) respectively with a spawn total of 14 each, while it may look tempting to farm in stages 3 and 4 by restarting the quest (similar to how monsterpark works), there is also one more opportunity to find the Boars and Rhinos afterwards in a later quest where you can farm them indefinitely until you've collected both of them which is the recommended method. The monsters in the quests are Level 110 as compared to the tower method at Level 115-117.
Side note: You cannot use Winter Bard to register The Seed's monsters despite the similar appearance.
9.4 Other Notable Monsters
Unlike the monsters above in Section 9.3, these monsters do not have any workarounds or in certain cases, the intended method may be more effective than the alternative method depending on the player's preference. I've included certain hard to obtain monsters in this section as to provide a detailed guide to collect them.
9.4.1 King Castle Golem (and Golden Bees)
King Castle Golem is among one of the hardest regular monsters to collect, this is because it is a boss monster coded with the registration rate of a regular monster.
King Castle Golem (and Golden Bee) spawns in any of the Rose Garden maps after a random number of monsters is killed in the map, this includes the starforce maps. Note that Golden Bee spawns in groups of threes and are more frequent in spawnrate compared to King Castle Golems. However, in Castle Wall's Edge (the map with regular Garden Golems, NOT the starforced ones), the spawn quantity for King Castle Golems and Golden Bees are doubled, meaning that you'll see two King Castle Golems (or six Golden Bees) spawning at once.
There are two methods to farm King Castle Golem, this also applies to Golden Bees as they share the same mechanics
Method 1: Stay in Castle Wall's Edge and spawn King Castle Golems.
According to Bryan on Monster Collection Discord, a King Castle Golem roughly spawns about every 300 kills and a set of Golden Bees will spawn roughly about every 200 kills, this is tested in Castle Wall Edge as it have the best spawnrate for King Castle Golems. In addition, unlike elite monsters, you can spawn them even if you're over the level range.
Method 2: "Scavenger Hunt" - walk around the first three maps, occasionally, another player may leave behind a King Castle Golem (or Golden Bees), kill it for a chance to register the monster.
9.4.2 Huge Golem and Reverse Dark Soul
Similar to King Castle Golem above, these two monsters are similarly coded as regular monsters for the purpose of Monster Collection.
Huge Golem and its fragmented forms
The second and third forms of Huge Golems were added to Monster Collection in MSEA V218.
Huge Golem (Giant Golem)
Broken Golem (Two of them will spawn when Huge Golem is defeated)
Shattered Golem (Five of them will spawn when a Broken Golem is defeated)
Huge Golems spawns in the blue zone (Labyrinth of Suffering - Interior 4 to 6)
Note that only ONE Huge Golem will spawn at a time in any given channel. For example, if a Huge Golem appeared in Suffering Interior 4 in Aquila Channel 7, no Huge Golem will spawn in Interior 5 and Interior 6 concurrently, the only way to get another Huge Golem to spawn in Aquila 7 would be to kill the Golem in Interior 4.
Huge Golems have a 10 minute respawn timer that activates the moment the first body is killed. If you were to only kill the Huge Golem and leave the Broken Golems (second and/or third forms) roaming around the map, a new Huge Golem will spawn even though golem fragments are still in the map.
Note that Huge Golem will spawn in any of the three maps based on the first player that enters any of the three maps after the spawn timer is up. For example, if I were to kill the Huge Golem in Aquila 12 in Interior 5 and then leave the map and ten minutes later, a player enters Aquila 12 Interior 4 and kills a monster, a Huge Golem will spawn there.
Reverse Dark Soul
Similar to Huge Golem, Reverse Dark Soul (Blackheart Negative) uses the same spawning mechanics. Up to TWO Reverse Dark Souls can spawn anytime in any given channel, however, only ONE Reverse Dark Soul can appear in each of the Central (Purple - Central 2 or 4) and Deepest (Green - Deepest 1, 2 or 6) area at a time. Reverse Dark Soul have a 10 minute respawn timer that activates when a Reverse Dark Soul in the particular zone is killed.
For example, if I were to kill a Reverse Dark Soul in Central 2 on my way to Deepest Area, the Central/Purple area will not spawn any Reverse Dark Souls for the next 10 minutes. However, I might see a Reverse Dark Soul appearing in the Deepest/Green area as the spawn pattern there is not affected by what happens in the purple zone.
Due to the popularity of the maps in the Green and Purple zones, it can be really difficult to track the spawn of Reverse Dark Souls. For example, if I were to kill a Reverse Dark Soul in Deepest 1 in Aquila 13 and then I timed myself to return 10 minutes later, I may not be able to get a Reverse Dark Soul to appear in Deepest 1 as there might be another player in Deepest 2 or 6 training there and would have triggered the spawn for Reverse Dark Soul.
Ministry of Monster Collection Discord suggested the following method to hunt Huge Golems (Giant Golems) and Reverse Dark Souls (Blackheart Negative):
9.4.3 [*] Eye of Time
At first glance, you might think that due to its low spawnrate, it is assigned a two star difficulty. Upon hoovering over its picture in the Monster Collection, you'd realise that you'll have to hunt the starforce version of this uncommonly seen monster. What makes this monster so annoying is that there is extremely limited spawnrate across the four maps that it spawns in.
Of the four maps that it spawns in, Detour 2 and Detour 4 only have one designated spawnpoint for the monster. Detour 1 and 3 however, have two designated spawnpoints each and as such, are generally better for farming this monster.
For Detour 1, the first spawnpoint is in the middle of the bottom platform, the second is at the right side of the top platform.
For Detour 3, the two spawnpoints are at the upper left and upper right platform respectively.
Depending on the character that you take to farm this monster, both maps have their advantages and disadvantages as Detour 1 have three platforms stacked on top of one another while Detour 3 is a horizontal map with two platform levels.
For example if I were to use Lara to mob either Detour 1 or 3, Lara is able to "cover" a platform with her spirit uprising skill, this helps to take care of one or both spawnpoints to ensure that the [*] Eye of Time is killed as soon as it spawns when the skill is active.
9.4.4 Blood Harp
Not to be confused with [*] Blood Harp
The non-starforce variant of Blood Harp is a low-spawning monster spawning in Sky Nest 1, however, there is also an alternative method to farm this monster using Mirror World Leafre.
Method 1: Farm it in Sky Nest 1
In Sky Next 1, Blood Harp only spawns on the platform circled below with two spawnpoints on that platform:
A good way to hunt regular Blood Harp is to put a summon on that platform to clear the Blood Harps as soon as they respawn, this is similar to the [*] Eye of Time example above.
Method 2: Mirror World Leafre
A player can run the Mirror World Dungeon: Forest East of Minar on a Zero to collect Blood Harp, similar to the method used to collect Horus (SEA & GMS) and Advisor Mummy (GMS) in Mirror World Pyramid
There are a total of 19 Blood Harps in total in the first two maps, with 9 in the first and 10 in the second.
Map 1 - the Blood Harps appears in groups of threes on the platforms underlined in red in the minimap.
Map 2 - the Blood Harps appears on the three platforms underlined in red in the minimap, the platform to the bottom right of my character spawns four Blood Harps while the other two platforms spawns three each.
This creates two different strategies to collect Blood Harp, depending on your preferences:
Strategy 1: Enter the dungeon, defeat the 9 Blood Harps in Map 1 and exit
Strategy 2: Enter the dungeon, clear the entire of Map 1, enter Map 2, defeat the 10 Blood Harps in addition to the monsters in Map 1 and exit
Personally, I'd prefer Strategy 1 as I find the second map terrain to be slightly more difficult to navigate compared to the first map.
9.4.5 D. Roy
The lesser of the two evils among the rare spawning field mobs of Magatia. While not as difficult as the Homunscullo, registering this monster can still be a challenge due to the rarity of the monster. There are a total of three methods to register this rare monster.
Method 1: Channel surf at Lab C-3
The advantage of farming in Lab C-3 is that D. Roy is Level 95, being the lowest level among the three methods, this gives the player a better chance to register the monster, however, the D. Roys in that map have a spawn cooldown. In addition, there could be players training in the map or other players looking for D. Roys which makes the spawn inconsistent
Method 2: Monster Park - Auto Security Area (requires a Level 105 to Level 139 character)
There are a total of 28 D Roys per run, with 8 in the fourth map, 10 in the fifth map and 8 in the final map. D. Roy is Level 111 in this Monster Park dungeon.
The advantage of using this method is that the player gets unlimited entries provided that the player talks to Spiggelmann upon clearing Stage 6 without exiting from the portal. However, this method can be tedious as it would likely take many runs just to register D. Roy.
Method 3: Mirror World - Alcando Lab B (requires a Level 150 and above Zero)
There are a total of 18 D. Roys each in Room 4 to 7 of the dungeon as seen in the screenshot below. This means that the player potentially gets up to 72 attempts to register D. Roy per attempt. D. Roy is Level 158 in this dungeon.
The catch? In addition to the monster being significantly higher level than the other two methods above, the boss of the dungeon is randomly pre-determined to spawn at either Map 6 or 7 of the dungeon which are located at opposite ends of the dungeon. In addition, once a player enters a map in the dungeon, they are required to clear every single monster in that particular map before moving on. On top of that, when the boss of the dungeon is killed, every single monster in that map is automatically defeated.
My strategy here would be to just pick either left or right and clear until you've reached Room 6 (left) or 7 (right) respectively. If the boss (Deet and Roid) spawns, try to clear all of the D. Roys before defeating the boss. If the boss doesn't spawn, clear the room and head over to the other side.
Personally, I've collected D. Roy in Lab C-3, however, this method seems to be the most inconsistent and would potentially require checking in every now and then to kill a wave of D. Roy from the first to last channel. This method is also used in the next monster below where you have no choice but to channel surf.
9.4.6 Rombot
While classified as a boss in-game, Rombot is classified as a regular monster for the purpose of Monster Collection.
To access the map which Rombots spawns in, make your way to Eos Tower 4th floor and find this secret entrance circled in red and enter the map.
Rombot have two spawnpoints in the map and they are located at different ends of the map. It is recommended to have a vertical mobbing skill such as Rope Connect to help you navigate the map.
The first spawnpoint is on the second highest platform on the map (one platform above the green platform), I've underlined the platform in red on the minimap.
The second platform is the third platform from the bottom, I've underlined the platform in red on the minimap.
The only way to register Rombot reliably is to channel surf the map from the first to the last channel and then return at a later time and repeat the process until Rombot is registered.
Note: In GMS, you can encounter and register Rombot in Mu Lung Dojo Floor 26, however, the odds are extremely low as Rombot is Level 158 in Dojo. It is possible for a player that consistently runs Mu Lung Dojo to register Rombot while doing their daily/weekly Dojo run or while running Dojo to collect other bosses.
I do not recommend using the Dojo method with the sole purpose of registering Rombot as it would take a long time to register it due to its level, the monster being located in Floor 26 which takes quite a bit time to get there and the fact that it is coded as a regular monster.
You cannot register Rombot in MSEA Mu Lung Dojo as it is named as Lombard.
9.4.7 Zakum's Summons
With the exception of Chaos Boogie, all of Zakum's minions are required for Monster Collection.
In order to get Zakum to summon his minions, you'll need to defeat all 8 of Zakum's arms while keeping his HP above 20% in order to trigger his second phase.
Once all of Zakum's arms are depleted and his HP is above 20%, this is how Zakum would look (Zakum would have visible crumbles over his body). In addition for Chaos mode, you'll need to deplete all 8 arms at the same time (before they regenerate) in order to trigger this phase.
This is the point where Zakum would start summoning his minions.
From this point, it is recommended that you stand at a corner and kill the minions as they are summoned. In Chaos mode (as pictured above), you'll need to avoid and kill the arms that Zakum will continuously summon without depleting his HP bar below 20% in order to get him to continuously summon minions.
Despite the fact that Boogie, Puco, Punco and Kusko can all be collected in Easy Zakum as a Level 50 monster, I recommend farming Punco in Normal Zakum until you've collected Opachu as Opachu does not appear in Easy mode.
9.4.8 Cygnus Commander Line, Temple of Time Page 3, Line 4
There are two ways to farm this line: You can enter choose to enter Easy or Normal Cygnus to farm. As long as you do not defeat Cygnus on that character, you can enter it as many times as you wish, with a 30 minute cooldown between entry that is shared between Easy and Normal mode.
In Easy Cygnus, Cygnus will only summon her commanders once, one at a time when her HP is depleted to a certain point.
In Normal Cygnus, she will summon her commanders twice, she will summon her commanders one by one first when her HP is depleted a bit, and then when her HP is at 10% or below, Cygnus will summon all five of her commanders a second time, giving you two chances to register.
The main difference between Easy and Normal Cygnus other than the number of times Cygnus summons her commanders is that in Easy mode, the summons and Cygnus herself have lesser HP and the cooldown in-between potion use is 15 seconds, while the potion cooldown is 30 seconds in Normal mode.
9.4.9 Baby Balrog
Baby Balrog will appear in the Balrog bossfight. To find out more, click on the spoiler below. Special thanks to Zelly here on Dexless for the Balrog Boss guide.
According to Zelly's Balrog Boss guide, you need to deal a minimum of 50k damage to Balrog during the first three minutes (ie before the timer reached 16:59) to not get kicked out. From there, my method for collecting Baby Balrog is to idle all the way until about like 2 minutes left
Starting when the timer reaches 13:20. Balrog will go into recovery mode during the bossfight periodically. This happens approximately every 2 minutes. During this recovery period, Balrog will summon 6 Baby Balrogs. You do not need to strike the altar to continue the battle as there is no failure condition for not putting Balrog out of recovery mode.
When it reaches approximately 1min20s to 1min15s left on the clock, this is when Balrog enters recovery mode for the final time - at this stage, Balrog will be invincible so you can safely kill all the Baby Balrogs without killing Balrog (note that if you strike the altar, the timing of the final recover will be different as I tested it without striking the altar).
This would allow you to collect 42 Baby Balrogs per 20 minutes run as seen in the screenshot above with battle statistics. As Baby Balrog pity caps at 320 kills, it would take up to 8 full runs to collect Baby Balrog using this method. As the run is very boring and tedious, it is recommended to do something else while waiting for the Baby Balrogs to spawn.
10. MONSTER COLLECTION GUIDE FOR THE SEED
This section covers only the Monster Collection details and specifics for The Seed, for a comprehensive guide on how to tackle The Seed, check out Sky's guide on Dexless under General Guides.
The second page of Victoria Isles (Near Victoria in GMS) consists of 25 monsters from Tower Under the Sea (aka The Seed), this page is among the most difficult to collect due to the amount of technique and luck involved in collecting these monsters.
In the picture below, I've circled certain monsters in different colours. Monsters without any circles can be obtained using a seed practice ticket, monsters circled in blue can be obtained using a seed practice ticket but have limited spawn while monsters circled in red and green (bosses) cannot be obtained via practice mode as you can't teleport to that floor to farm the monster.
In order to unlock a floor to practice, a player must reach the floor at least once in order to unlock that floor to practice, however, not all floors can be practiced (see below for details). In practice mode, Finley the monkey will not appear and you can collect monsters in The Seed's practice mode.
Collecting Blue Flower Cow, a Stage 13 monster from Practice Mode
Personally, I do not recommend farming the regular mobs in the Top 2 rows (the exception being Floor 1 slime as you'll just need to kill a king slime to count as a clear) by using a ticket or exhausting the timer as you'll eventually need to run The Seed many, many times in order to collect the two Beetles which have a limited spawn and you are not able to teleport to that map alongside the bosses.
The Seed specific floors guide for Monster Collection:
Note that I did not include bosses in the guide as the only way to collect them is to encounter them and hope that it registers for you, you cannot use a practice ticket on a boss stage.
In General: All monsters in The Seed can be registered at a low chance by simply killing them on the way to Floor 50, this section of the guide covers the usage of seed practice tickets and other methods in an attempt to speed up the collection process.
10.1 Floors 1 (ancient blue and purple slimes), 3 (ancient turtles), 8 (volcano bugs) and 11 (flower golems)
Note that Ancient Blue Slime in Floor 1 is not the same monster as Blue Ancient Slime in Floor 32 and are treated as two distinctively separate monsters with different appearances despite the similar sounding names
With the exception of the first floor slimes, I do not recommend farming these mobs as they are easily accessible with some practice.
Usually, players will kill one king slime in the first floor before proceeding to the second floor and hence, in order to collect those two slime monsters in Floor 1, you'll have to spend a bit of time to farm and collect.
The flower golems may take a few tries due to it being above Level 120 but as you'll need to hunt 300 golems (of any kind) to complete the stage, it is only a matter of time before you collect them. If you wish, you might want to use up a few rounds without any hazy stones (SEA)/stupid pills (GMS) to farm stage 1 for the two slimes as they can be accessed from the start.
10.2 Floor 13 (4 monsters and one stage filled with meteors)
Floor 13 is required for the third row alongside Cowardly Lion, while you're clearing this stage, you might collect these mobs after several runs as you progress further deeper into the tower, collecting monsters in this stage is luck based due to limited spawns as each monster is guaranteed to spawn 15 times alongside 25 randomly spawning monsters from one of the four types for a total of 85 at the end.
However, due to a relatively cheap practice ticket cost of 348 points (338 points + ticket costing 10 points), saving up seed points and buying tickets to use on Sunny Sundays is a good way to collect these limited spawn mobs.
10.3 Floor 26 (Orange Ancient Slimes) and Floor 34 (Yellow and Purple Curly Cows)
(Floor 26) and
(Floor 34)
The monsters in Floor 26 and 34 cannot be accessed with a practice ticket, the reason seems to be related to the monster's ETC being used as an item to complete the stage as Floor 29 which involves Dark Sand Dwarves is also not accessible via a practice ticket.
Finley will spawn after 5 minutes in Floors 26 and 34. in Floor 26, you're required to kill 300 orange ancient slimes, as such, you should be able to collect this mob after a few runs.
For Floor 34, this stage is rather straightforward for The Seed's requirement, however, this stage is extremely annoying for Monster Collection as the purple cows have a heavily limited spawnrate (spawning about 1-2 per platform) and it is affected by the spawn of yellow cows.
As you can't practice this stage, a way to collect this monster is to use Sunny Sundays double collection chance and use up a few runs hoping you can register it. Note that similar to Stage 13 (or any other stage), it is possible to register the mobs with some luck when running The Seed.
10.4 Floor 31 (Insectivore Slimes)
You're required to kill 200 slimes (of any kind) per run, similar to Stage 26, you should be able to collect these two mobs after running The Seed a few times, alternatively, you can spend 1932 seed points (ticket costs 10 points + 1922 points) to enter Stage 31. In addition, you can purchase hazy stones (SEA)/stupid pills (GMS) to increase the timer before entering the stage, this is best done on Sunny Sundays to greatly increase your chances to collect these two mobs.
It is also cheaper to spend 3 Highest Grade Engraved Hazy Stones (SEA)/Prescription Pants on Head Stupid Pills (GMS) for 1800 points to increase your timer to 58 minutes for a total cost of 3722 points rather than to pay for 2 rounds (20 minutes) at a cost of 3844 points, combined with Sunny Sunday, this would greatly increase your collection chances for both mobs in this stage.
10.5 Floor 32 (Blue Ancient Slimes)
These ancient slimes have a limited spawn and you're required to kill them all to advance. Thankfully, these monsters have a slightly better spawn rate compared to the Floor 13 mobs. Similar to floor 13, you can buy a practice ticket, the cost is rather expensive (costing 2058 seed points in total) and as such, my recommendation is to stock up on seed points and buy seed practice tickets on Sunny Sundays if you really want to collect this monster quickly.
10.6 Floor 48 (Ancient Beetles)
With a limited spawn and this stage being inaccessible via practice tickets, collecting these two beetles takes a good amount of luck to collect. There seem to be 9 orange beetles and 16 purple beetles spawning in each attempt (confirmation required on the number of beetles).
10.7 Scarecrow via Mirror World (Zero's prequest)
This workaround was originally discovered by KMS Youtuber SSUNEE which requires creating a new Zero and doing the prequest.
When you enter the map with the Scarecrow, kill the Scarecrow and log out without turning in the quest. Repeat until it is registered. Note that you cannot forfeit the quest and in the event that you accidentally turned in the quest as Alpha, Beta will also have a chance to collect the Scarecrow mob as Beta needs to kill the Scarecrow as well.
Thanks to Sky of Dexless for information pertaining to Finley's spawn time and for the comprehensive guide to guide me to clear specific stages such as Floor 22 and 24 for The Seed
11. MONSTER COLLECTION GUIDE FOR PARTY QUESTS
There are a number of party quests monsters that are required for Monster Collection. This section here will cover the various party quests that have monsters that you'll need to collect for Monster Collection.
If possible, try to keep the party average level as low as possible as a lower levelled monster would have a significantly higher chance to register, this scales up to Level 121. Note that in certain party quests, this is not possible due to the lower level limit of the monster being Level 121 and above.
I did not include Lord Pirate PQ in this section of the guide as the only monster that is required from the PQ, Lord Pirate, can be obtained through Monsterpark and Mirror World as alternative registration methods.
As of MSEA V209, you can now collect monsters from Cross World Party Quests despite the fact that it was not mentioned in the patch notes. This is confirmed by Strival of Monster Collection Discord who successfully collected the boss of Ellin Forest PQ by running the PQ.
In the screenshot below, I've registered Poisoned Stone Bug while running the PQ on a Kanna.
Contents:
11.1 Cooking with Tangyoon
11.2 Xerxes in Chryse
11.3 Resurrection of the Hoblin King (Rex/Shammos PQ)
11.4 Dragon Rider
11.5 Dimensional Crack (Ludi PQ)
11.6 Romeo and Juliet (Magatia PQ)
11.7 Nett's Pyramid
11.8 Forest of Poison Haze (Ellin Forest PQ) - Cross World Party Quest
11.9 Remnant of the Goddess (Orbis PQ) - Cross World Party Quest
11.1 Cooking with Tangyoon (Minimum 1 player)
Minimum level to enter: Level 60 (monsters level cap at Level 90)
Required monsters for Monster Collection:
Obese Pig (Portly Pig)
God of Cookery (Mr Chomps)
Obese Pig is one of the five monsters that can be selected to be spawned during the second stage of the PQ, while it is tempting to spawn Obese Pigs on every single run until you've collected the monster, I strongly recommend against it as God of Cookery is much more difficult to register in comparison. God of Cookery will only spawn if you have completed the PQ "successfully" by following the instructions of the dish by adding the correct ingredients.
In addition, you can register various other monsters such as Snowman, Grape Juice Bottle and Nependeath from the PQ to name a few.
11.2 Xerxes in Chryse (Minimum 1 player)
Minimum level to enter: Level 110 (monsters do not have a level cap in this PQ)
All monsters in this party quest are required for Monster Collection:
Stage 1:
Gerbil (Rabbit) and
Golden Gerbil (Golden Rabbit)
Three of each of these monsters will spawn in the first stage, you will need to press the jump key when standing directly below the devices, then an arrow like device will be fired into the sky, killing one monster at random within proximity. You cannot kill the monsters directly, but you can attack them to lure them towards you.
If you want to farm these monsters, you can enter Chryse, activate the devices to kill all 6 monsters, and then leave party and try again for five rounds. After that, you can swap characters and try again.
Stage 2:
There are a total of six different types of monsters spawning in this stage:
The four monsters below are required for the Zakum Cube Chair (El Nath Page 4)
Ferret
Golden Ferret
Mammoth
Scorpie
The two monsters below are required for the first page of El Nath Mountains section which gives a 24 hour exploration line when the line is completed:
Golden Scorpie
Golden Mammoth
To maximise your chances to collect the above monsters, it is recommended that you actively kill the monsters during the stage and not idle for approximately three minutes for the stage to end. I've tested the stage twice, once by idling until the final wave commenced, and the other actively killing monsters, here are the results:
This is how many monsters I've killed in total after idling at a safe spot and letting the monsters spawn until the final stage:
This is how many monsters I've killed in total over three minutes actively killing monsters that spawned during the waves:
Assuming that the spawn of every monster is of equal 1 in 6 chance, this roughly estimates to about 131 kills per type which is significantly much higher than idling for three minutes, giving me an average of 14 kills of each monster type.
Stage 4: Xerxes Boss Stage
The following monsters are required for the Zakum Cube Chair:
Kephivara
Tragoth (Tragos)
Xerxes will summon Kephivaras when his HP reaches 70% and below, he will summon Tragoth when his HP reaches 50% and below. Note that there is a map capacity of approximately 50 monsters and Xerxes have a 60 second cooldown between Tragoth summons. Xerxes will only summon a maximum of 5 batches of 6 Tragoths for 30 per run, and if the map is at its limit when Xerxes attempts to summon Tragoth, Tragoth will not be summoned but it will count as a summon attempt.
This meant that the player must actively clear Kephivaras to make room for Tragoth to spawn. Kephivara is summoned very frequently and as such, is significantly easier to collect compared to Tragoth.
Xerxes himself is required for a 24hr exploration line alongside Golden Mammoth and Golden Scorpie found above in Stage 2. Alternatively, you can also encounter Xerxes in Mu Lung Dojo Floor 33 where you get two chances to register him per Dojo attempt
Xerxes
11.3 Resurrection of the Hoblin King (Minimum 2 players)
Minimum level to enter: Level 170 (monsters level cap at Level 189)
In this PQ, you will have to protect Shammos from waves of monsters that will spawn while escorting Shammos to where Rex is sealed, Hoblin Hectors, Elite Hoblins and Combat Hoblins (alongside the not required Elite Green Hoblin) will appear in waves throughout the PQ in an attempt to damage Shammos. In addition, in the second and third maps, specific hoblin monsters will spawn naturally alongside the waves of monsters.
Required monsters for Monster Collection:
Hoblin Hector
Hoblin Hector spawns in waves in all three maps, note that in the second and third map, Hoblin Hectors will spawn alongside other monsters in the waves, in addition, whenever Shammos attacks, he will summon a Hoblin Hector
Elite Hoblin
Elite Hoblin spawns in waves in the first two maps, note that in the second map, Elite Hoblins spawning in waves will appear alongside other monsters
Combat Hoblin
Combat Hoblins spawns naturally in the second map and spawns in waves in the third map alongside Hoblin Hectors (and Elite Green Hoblins)
Ferocious Hoblin
Ferocious Hoblins only spawns in the third map as a natural spawn, due to its rarity, it is considered as the most difficult of the four regular monsters to collect as they do not appear in waves at all
Rex
The boss of the PQ, Rex can be fought if you successfully escorted Shammos to the ice cave.
11.4 Dragon Rider (Minimum 3 players)
Minimum level to enter: Level 150 (monsters level cap at Level 169)
Please note that all players would need to complete a prequest to obtain the soaring skill before being able to enter the PQ. In this PQ, you will need to eliminate all monster to proceed to the next stage.
Required monsters for Monster Collection:
Stage 1: Soaring Eagle (Green) and Soaring Hawk (Purple)
A total of 20 Soaring Eagles and 20 Soaring Hawks will spawn in this stage (total 40 monsters)
Stage 2: Soaring Griffey
A Soaring Griffey will appear in Stage 2 alongside a swarm of soaring wyverns, Soaring Griffey seems to be classified as a regular monster for the purpose of Monster Collection
Stage 3: Dragonoir
Stage 5: Dragon Rider
11.5 Dimensional Crack (Minimum 3 players)
Minimum level to enter: Level 120 (monsters level cap at Level 139)
Required monsters for Monster Collection:
Dark Eye from Another Dimension
There are a total of 5 Dark Eyes from Another Dimension in Stage 2, these monsters only spawn in the bottom two portals of the stage, the top 3 portals contains Shadow Eyes (total of 9 of them) which are not required for Monster Collection
Important note: I strongly do not recommend using a team of 3 Level 120 players to run this PQ in an attempt to collect Dark Eye for Another Dimension as the difference of collection chance between Level 120 and 121 monsters is not really much of a difference, further made worse by the exceedingly low spawnrate which relies extremely heavily on luck
Alishar
Alishar is found at the end of the PQ, note that you can register Alishar from Dojo and Mirror World as an alternative
11.6 Romeo and Juliet (4 players required)
Minimum level to enter: Level 70 (monsters level cap at Level 99, note that this does not matter for the purpose of Monster Collection in Magatia PQ as both monsters required are bosses)
Required monsters for Monster Collection:
Frankenroid and
Angry Frankenroid
For the purpose of this section, I'll only cover Angry Frankenroid as it requires the player to follow the steps below in order to summon Angry Frankenroid. Note that you do not need to follow the steps below to summon regular Frankenroid.
Here are the steps to spawn Angry Frankenroid:
1. In the first map, you must find the love letter hidden somewhere in the map, this is important as the person who found the love letter will need to give it to the NPC in Stage 4. The love letter will be hidden randomly where you must click on the glowing parts (circled) to search for it (alongside the switch to the second stage)
Juliet's letter has been found in the screenshot below.
Note: If a player opens the portal to the next map, you can still continue to search for the letter provided that you do not enter the portal to the second stage.
2. In Stage 4, if you're helping Romeo, the person who had the letter in their inventory must give Juliet's letter found in Stage 1 to him (and vice versa, if you're helping Juliet, you must give Romeo's letter to her that was found in Stage 1)
3. Upon entering Stage 5, very carefully, click on Urete (Yulete in GMS) without getting too close to him. If successful, a blue text will appear in your chatbox (see screenshot below) and Angry Frankenroid will be summoned at the end of the PQ, if you do not get the blue text below, regular Frankenroid will be summoned instead. It is recommended to run this stage with a screen resolution of at least 1024x768 so that you can click Yulete more easily.
If you walk too close to Urete, this popup will appear and several monsters will be summoned (which you must kill all to proceed to the next stage), you must click on Urete to get the text in the above screenshot before walking too close to Urete in order for Angry Frankenroid to be summoned.
4. At the boss stage, the party leader needs to talk to Urete to summon Angry Frakenroid, provided that the party fulfilled both conditions above (giving the letter to Romeo/Juliet) and getting the "We were able to hear Urete mumbling to himself text" in the chatbox.
Special thanks to Akuma and Keni from MSEA Discord for helping me with running Magatia PQ in the above screenshots.
Note that you can encounter and collect regular Frankenroid in Mu Lung Dojo Floor 23.
11.7 Nett's Pyramid (4 players required)
Minimum level to enter:
Normal Mode: Level 80 (Maximum player Level 89)
Hard Mode: Level 90 (Monsters do not have a maximum level and it scales to the party level average)
Required monsters for Monster Collection:
Horus - Appears in Waves 8, 13 and 17
12 Horuses will appear In Waves 8 and 13 each. 20 of them will appear in Wave 17 for a total of 44 monsters in a run.
Advisor Mummy - Appears in Waves 9, 16, 18 and 19
12 Advisor Mummies will appear in Waves 9 and 18 each. 20 of them will appear in waves 16 and 19 each for a total of 64 monsters in a run.
Pharaoh Yeti - Appears in Wave 10
8 of them in total will appear in Wave 10. These are coded as bosses in Monster Collection and are relatively easy to register.
Pharaoh Snake - Appears in Waves 15 and 19
12 of them will appear in Waves 15 and 19 each for a total of 24 monsters in a run.
Pharaoh Mummy - Appears in Wave 20
Two of them will appear in Wave 20. These are coded as regular monsters and are incredibly difficult to register due to the fact only two of these will appear in a run.
Special thanks to Shampion of Monster Collection Discord for the information pertaining to the spawn count for each of the monsters in Pyramid PQ.
11.8 Forest of Poison Haze (4 players required, this is a rotating Cross World Party Quest)
Minimum level to enter: Level 70 - it seems like the monsters here are estimated to be around Level 180, noting that the monsters here do not have a level tag
Required monsters for Monster Collection:
Stage 1: Poisoned Lord Tree
40 of these spawn in the first stage
Stage 2: Poisoned Stone Bug
These monsters spawns in pairs at a time, one on each side, they are the only monster in this PQ that you can hunt an indefinite number per run (subjected to a time limit), however, the spawnrate is very low.
Stage 4: Poisoned Spright
There are 30 Poisoned Sprights that you need to kill to obtain their marbles
Stage 6: Poison Golem (form 1 of 3)
Please note that only the first form of Poison Golem counts for Monster Collection, the second and third form uses different names and hence, will not count.
In addition, the second and third (final) form of Poison Golem will occasionally summon some monsters, please note that none of these will count towards the Monster Collection as they are named differently despite having identical appearances to the monsters encountered in previous stages
For example, in the screenshot below, the Tree Lord summoned by the boss is named as "Deeply Poisoned Lord Tree" (Poison Golem Level 2 in GMS).
11.9 Remnant of the Goddess (4 players required, this is a rotating Cross World Party Quest)
Minimum level to enter: Level 70
Required monsters for Monster Collection:
Stage 3: Ghost Pixie
In Stage 3, the map is divided into six platform, for are a total of 30 pixies in the map, killing these pixies will summon a Ghost Pixie in place. Note that the Ghost Pixies that appears upon killing a pixie will automatically die in 10 seconds if not killed.
The Ghost Pixie is surprisingly easy to register, this is likely to be the fact that Ghost Pixie is a low-levelled monster in the PQ. I've did the party quest with three other players and we all registered Ghost Pixie within 5 rounds.
Stage 6: Papa Pixie
Papa Pixie can be found at the end of the party quest, if you are running the party quest for Ghost Pixie, you might want to try and register him at the same time, however, the easier option would be to consistently run Mu Lung Dojo as the party quest is rotational and as such you might have to wait a long time before the next cycle.
Papa Pixie will summon Star, Lunar and Luster Pixies when his HP is below a certain threshold. These pixies will turn into Ghost Pixies upon death.
Note: I did not test out on whether the summon variant of Ghost Pixie can be registered when running the full party quest, as such, I do not know if the summoned variant of Ghost Pixie is registerable as Ghost Pixies do not come with a monster name tag
Personally, I would recommend only clearing the first two stages and then allowing whoever that doesn't have Ghost Pixie registered to kill the Pixies in Stage 3 before exiting the party quest and trying again.
12. MONSTER COLLECTION GUIDE FOR FRIENDSTORY AND SPECIAL PAGES
Two new tabs were added into Monster Collection in KMS V1.2.368 - Friendstory and Special Pages.
Contents:
12.1 Friendstory Page 1
12.2 Friendstory Page 2 (Excluding Omens)
12.3 Special Page (Including Omens from Friendstory page) - Work in Progress
Flame Wolves, Ursus and Monster Park Extreme will be added in a future update
12.1 Friendstory Page 1
The first page of the Friendstory tab consists of monsters from the Shinsoo High Old Wing. All of these monsters can be accessed after completion of Friendstory Chapter 6.
Things to take notes of the Shinsoo High Old Wing Dungeon:
1. You can enter a total of 10 times each day per character.
2. There is an internal time limit of 2 minutes and 40 seconds per stage, and 4 minutes for the Rooftop stage, regardless of what the timer on the top displays. Note that if you do not kill the boss monster within the 2 minute and 40 seconds time limit, all remaining monsters and the boss monster will automatically despawn and you will be moved to the next stage.
3. The boss will spawn approximately 40 seconds into each stage, you do not need to kill any of the regular monsters to trigger the boss to spawn.
4. A total of 30 regular monsters will spawn in each stage. There are two types of regular monsters in each stage. Note that the monster ratio is not equal as for monsters from on the first column on each the left in the collection page, only 12 will spawn in total, while 18 the second monster from the left will spawn at a time. Killing the boss before killing any remaining regular monsters will cause the regular monsters to despawn.
5. You will only encounter four out of the five possible stages in each run and they will be randomly selected. This means that there is a chance that you may not get the stage that you want. You will always get the Rooftop stage as the fifth and final stage of each run
12.1.1 Infirmary (Line 1)
Band Mong
Thermal Mong
Doubtful Lady (Otherworldly Lady) (Boss Monster)
12.1.2 Art Room (Line 2)
Squeeze Mong
Ripa Mong
Van Gong (Otherworldly Artist) (Boss Monster)
12.1.3 Science Lab (Line 3)
Farsighted Mong
Ember Mong
Science World (Summoned Monster)
Dr. Choi (Otherworldly Doctor) (Boss Monster)
To collect Science World (Science! in GMS), you will need to damage Dr. Choi without killing him. Once his HP is reduced, he will start to summon Science World monsters that behaves similarly to the Wipers from the Kawoong boss battle. Unlike Wipers, they do not despawn after a set period of time, however, they will despawn once the internal time limit of 2 minutes and 40 seconds is up or when Dr. Choi is defeated.
Note that the time limit at the top of the screenshot is misleading as you only have approximately less than 2 minutes to spawn and kill Science World monsters since it takes 40 seconds to summon Dr. Choi and a maximum of up to 2 minutes to kill as many of these summoned monsters.
12.1.4 Music Room (Line 4)
Harp Mong
Drum Mong
C Dragon (Otherworldly Star) (Boss Monster)
12.1.5 Classroom (Line 5)
Shy Mong
Bashful Mong
Snacky (Otherworldly Kid) (Boss Monster)
12.1.6 Rooftop
You will always encounter Bat Bull in the final stage in each run.
Bat Bull (Otherworldly Beast) (Boss Monster)
12.2 Friendstory Page 2
The following monsters can be found in Friendstory maps where you get a 10 minute limit to kill as many as possible, GMS names are in italics:
Dust
Shooting Dust (not collectable in GMS, see important note below for all three mobs)
Flying Dust (not collectable in GMS)
Rolling Dust (not collectable in GMS)
Poison Dust (Poison Mote)
Hollow Dust (Hallow Mote)
Due to a naming inconsistency as dated 16 Nov 2022, the following three monsters must be collected in Kinesis' storyline - this involves creating a new Kinesis and killing monsters in the questline. Please pay attention to the monster name as follows:
In order to collect the monsters above, you need to create a Kinesis and kill the monsters as seen in the image below by Thom of Monster Collection Discord. In the event you didn't register the monster, do not turn in the quest, instead, exit the portal on the left to get another shot at the monsters.
In addition to farming in the dungeons, an alternative method is to farm them by participating in the questline where you are required to kill three maps worth of monsters in a row. At the end of the third map, instead of exiting via the portal, log out of the game and re-enter. This is because if you exit via the portal after the third map, you cannot retry for the quest again (unless you reset the entire Friendstory questline from Chapter 1). There are a total of four of these three-map kill quests from Chapter 1 to 5 in total. This alternative method is crucial for registering the two rocker monsters covered below.
A tip that you can utilize to prevent your character from accidentally entering the portal in the final map is to intentionally leave 1 monster alive (preferably one of the motes that you can collect from Kinesis storyline as you can't collect them in GMS) so that you are unable to enter the portal.
Note that each of the four different map layouts for the three-map format have different spawn ratios of each monster and the spawn layout is fixed. Hollow Dust is the rarest by far, with a spawn of approximately 5 in each of the four quest maps. Thus, it is preferable to farm Hollow Dust in the dungeon maps.
The two rocker monsters below appears exclusively in Chapter 6.
Rock Mania A (Hard Rocker)
Rock Mania B (True Rocker)
You are given two opportunities to register them in the form of three-map kill quests. To effectively farm them, you need to logout instead of exiting via the portal upon the completion of the third stage.
There are two different three-map layouts in the spoiler below.
Layout 1: Shinsoo High Old Wing - Total: 25 male, 28 female rockers
Map 1: 15 male rockers
Map 2: 10 male, 11 female rockers
Map 3: 17 female rockers
Layout 2: Drizzle Trail - Total: 31 male, 43 female rockers
Map 1: 19 female rockers
Map 2: 15 male, 11 female rockers
Map 3: 16 male, 13 female rockers
There are seven troublemakers that you will need to collect, each Troublemaker monster appears at the end of the chapter as follows:
Prologue: Knuckle Troublemaker (Fistfight Troublemaker)
Chapter 1: Greedy Troublemaker
Chapter 2: Torchy Troublemaker (Forever Alone Troublemaker)
Chapter 3: Lonesome Troublemaker (Born Single Troublemaker)
Chapter 4: Two-faced Troublemaker
Chapter 5: Squid Troublemaker
Chapter 6: Proud Troublemaker
If you did not manage to register the Troublemaker, DO NOT turn in the quest as you will not be able to encounter the specific troublemaker again for the run unless you reset the Friendstory questline, instead, exit the map via the portal and re-try again.
Note that you can only complete the prologue once per character (resetting will bring you back to Chapter 1), in order to encounter Knuckle Troublemaker, you'll need to do the prologue on a different character if you have already cleared it.
12.3 Special Page Monsters
Bounty Hunter Portals are a good way to collect certain rare spawn and party quest monsters as detailed below, with some luck, you might register these monsters. As of MSEA V218, certain monsters must be registered specifically from these portals.
12.3.0 Bounty Hunter Portals general information
Special thanks to Bready of MapleSEA discord for the information pertaining to Bounty Hunter Portals.
For Bounty Portals:
Phase 0: At least 10 minutes after the previous bounty portal disappearance
Phase 1: After Phase 0, kill 1,000 monsters within 20 levels from your character by yourself
Phase 2: After Phase 1, each monster within 20 levels from your character killed by yourself has a chance to spawn the bounty portal by yourself
Every 4th Bounty Portal spawned by the same character, it will be an Especia Bounty Portal instead.
For Flame Wolf:
Phase 0: At least 15 minutes after the previous flame wolf portal disappearance
Phase 1: After Phase 0, kill 1,000 monsters within 20 levels from your character by yourself
Phase 2: After Phase 1, each monster within 20 levels from your character killed by yourself has a chance to spawn the flame wolf portal by yourself
Portal Notes:
During Haste and Events, the chance of spawning the Bounty Hunter and Flame Wolf portals is increased and after Phase 0 (ie Phase 1), kill 500 monsters within 20 levels from your character by yourself to trigger Phase 2
Note that you cannot have a Bounty Hunter and Flame Wolf portal appearing at the same time. The 10/15min cooldown at Phase 0 is counted only when you are logged in. Kills made during Phase 1 will be saved even when logging out.
If you have reached the daily limit for either Bounty Hunter Portals or Especia Portals, both portal types will no longer spawn for the day.
12.3.1 Protect Polo
The Omens from Friendstory appears in the final stage of the Protect Polo portal with Five Omens, five Master Omens and one King Omen will appearing. Credits to Shampion of Monster Collection Discord for the information.
As the Omens have alternative methods to register, click on the spoiler below to learn more about these three Omens.
Omens and
Master Omens appears in Kinesis Level 75 quest.
For the Kinesis quest method, only three Master Omens will appear at a time, in the final Subway Car. In addition, there are a number of regular Omens that will spawn in all three Subway Cars. Unlike most other kill quests, if you have registered Omen, you can just skip the first two subway cars and go into the third to focus on Master Omens.
If you didn't register the monsters after the third car, simply logout from the game and re-log in to retry. In the event you accidentally entered the portal after the third subway car, you will need to force quit the game while the cutscene is being played in order to get another chance to register them.
I strongly recommend either farming them in Bounty Hunter Portals or using the Kinesis method as Master Omen is Level 77 here (with a pity cap of 1650), Omen is Level 75 here and quite a number of them will spawn at a time in the subway.
For Shade's quest, despite the monster being Level 65 (hence, a pity cap of 500), you cannot repeat the quest after killing that one Master Omen that appears, making it completely unviable for Master Omen farming.
King Omen
King Omen appears at the end of the Kinesis storyline at Level 100. If you wish to farm King Omen using Kinesis storyline, you will need to log out upon killing King Omen when the cutscene is being played. This method is incredibly tedious as it requires you to completely log out of the game and then restart the game and re-log in just to get another try.
The workarounds for King Omen would be either to farm in Bounty Hunter Portals or at Mu Lung Dojo Floor 39. Note that King Omen cannot be collected in Dojo in MSEA as of V218 due to King Omen being incorrectly named.
In addition, Soaring Eagle and Dragonoir (GMS only) from Dragon Rider PQ can be obtained from Protect Polo, note that you can also register regular Griffey (NOT Soaring Griffey) from the portal.
Soaring Eagle for both MSEA and GMS,
Dragonoir for GMS only
NOTE: You cannot register Soaring Hawk (the green bird) from the portal due to an additional spacing in the name of the intended monster. This screenshot is taken in MSEA.
The portal Soaring Hawk is named as "Soaring Hawk" while the intended monster which can be found in the Dragon Rider party quest is named as "Soaring Hawk " with an additional spacing at the back, this makes the portal workaround impossible.
12.3.2 Frito's Eagle Hunt
A line consisting of monsters from Eagle Hunt. These monsters do not scale to level and are fixed at Level 11, with a pity cap of 200 kills.
Eagle - 6 of these will spawn
Black Eagle - 3 of these will spawn
Golden Eagle - 2 of these will spawn
Bald Eagle - 4 of these will spawn
The minigame will end once all of the non-Bald Eagles have been defeated, as such, if you want to collect the Bald Eagle, you will need to shoot them before shooting the other eagles.
Until you have collected Bald Eagle, you'll have to accept the -40% less EXP and a smaller reward for shooting the Bald Eagle (650 to 950 points will yield you 720x monster EXP, while a perfect 1000 points will yield 1200x monster EXP for the portal, credits to Bready of MapleSEA discord for the information).
12.3.3 Stormwing
Stormwing
Golden Bee
Gold Slime (Divine King Slime's summoned monster)
A total of five Stormwings will appear in the Stormwing minigame, in order to trigger Golden Bee and Gold Slime to spawn, you will need to kill the Stormwings. The Golden Bee and Gold Slime usually spawns near the very end of the run where you have killed 4-5 Stormwings.
12.3.4 Totem Slashing (Especia Portal)
In Especia's portal, you will get to slash 30 totems per entry.
Five totems makes up this line:
Chicken Totem
Monkey Totem
Tiger Totem
Snake Totem
Golden Totem
The Golden Totem is incredibly rare, it is entirely possible to run more than 50 runs and never encounter a single Golden Totem. When Golden Totem appears during a round, a few of them will appear at a time. What makes Golden Totem very difficult is that it is assumed to be a regular monster that scales to level, further ramping up the difficulty of this monster (Note: even at character Level 10 with a pity cap of 100, it is still insanely hard since you need to hope for the portal to spawn a Golden Totem).
13. COLLECTING MONSTERS USING MOMONS
There are two main types of Momons (aka Monsterblooms in GMS) that exists in the game:
1. Momons that registers a specific monster
2. The Mysterious Momon
13.1 Momons that registers a specific monster
The followng Monsters are exclusively registered using specific Momons:
Ice Golem - Completing the Snow Witch/Elite White Fang Line
Cheap and Fancy Amp (Section 5 above)
Prime Minister Mushroom - Completing the Black Viking Line (See Section 5 above)
Poison Flower - Monster Collection Tutorial
The following monsters due to circumstances, can ONLY be registered using a specific Momon, unlike the above, the following below are due to design:
Horntail^ and Chaos Horntail - Defeating those bosses will yield their respective Momons at a low rate
^See Section 6 above for the exception
13.2 The Mysterious Momon
The Mysterious Momon (Mysterious Monsterbloom in GMS) is occasionally available during events and Sunny Sundays as pictured below.
What does a Mysterious Momon do? It basically selects a monster at random from the monster collection to be registered. If it lands on a monster that you currently do not have in your collection as pictured below (in this case, Blackheart Negative), a text will appear to tell you which monster you've registered using the Monsterbloom. If it lands on a monster that you have already registered, you'll obtain one 24 hour box (aka the black box) instead.
Important Note: The Mysterious Momon DOES NOT guarantee you to register a new monster. In addition, the Mysterious Momon will only register monsters that have a 3 star rating or lower including elite monsters with the exception of the seal elite as it have four stars, this means that you'll not be able to register endgame bosses and Mu Gong through this method.
If you managed to register an elite monster from a Mysterious Momon, the following message below will be displayed instead of the one in the above screenshot: Elite monster [Monster Name] has been added to your collection
In GMS, the following text will be displayed:
The Elite Monster [Monster Name] was added to your Monster Collection
This pop-up will appear if the Mysterious Momon lands on a monster that you already have.
14. MONSTER REGISTRATION RATES (WORK IN PROGRESS)
Table of Contents:
14.0 Background Information
14.1 Collection Rate for monsters Level 120 and below
14.2 Collection Rate for monsters Level 121 and above (currently unavailable)
14.3 Collection Rate for boss monsters (currently unavailable)
14.0 Background Information
When MapleSEA has gotten the updated Battle Statistics function to count the number of monsters killed, I've decided to test out the collection rate for regular monsters, notably the ones below Level 121 which were difficult to test prior to the Battle Statistics update.
I've done the sampling of various monsters in a new account in an attempt to derive the registration rates of monsters based on their levels. The information that is in this section is accurate at the time of posting.
An interesting discovery that I made while collecting monsters using a new account is in the spoilers below:
Tino registered at 102 kills:
Murupia registered at 101 kills:
Snail registered at 100 kills:
Slime registered at 101 kills:
Four monsters, all within the Level 1 to 10 range, registered with an upper limit of 100. Noting that due to the multikill nature of the attacks, the battle statistics number can display a number slightly above the cap. This prompted me to do further research, which can be seen in the table below:
This is the number of kills that it took to register the following monsters that are within Level 1 to 10. The kills are counted using Battle Statistics and auto-screenshot function is used to capture the moment the monster is registered.
At first glance, it might seem like a coincidence, but then, I decide to move on to test on monsters range between Level 11 to 20 (see Section 14.1 below) and this yielded a similar pattern, monsters getting registered after exactly 200 kills if the monster hasn't been registered by then. I've expanded and sampled up to Level 70 monsters as at the point of writing and discovered that there is an upper limit on the number of kills for registering monsters (at least up to Level 70).
DISCLAIMER:
The information under this section may be subjected to slight inaccuracies as the method used to test the collection rate is by using Battle Statistics to derive the total number of monsters killed before the auto-screenshot for Monster Collection appears on the screen.
The following assumptions and observations are made:
Pity cap kills made are cumulative based on mobID as I participated in 18 Totem Slashing portals before using a Level 10 Cadena to spawn a portal, during that portal run, I registered each of the 4 regular totem types the moment my Cadena killed the first of each type during the portal run. This indicates that for monsters with variable level such as Friendstory and Chryse, you can adjust the level of the monster to Level 120 and below to make it easier to register (after you pity cap the monster).
It is speculated that monsters that are killed under a rune curse do not count towards the number of kills to guarantee a registration, this can be seen in the case of the Garbage Dump Hooligan which took a total of 340 kills which is above the 320 kill cap. The reason why it took 340 kills was due to a cursed rune that was only freed after a few monsters were killed and hence, any kills made when there was a rune curse did not count to the kill cap but counted towards the total kills in Battle Statistics, inflating the total kill count as a result.
Any partially killed monsters will not count towards a pity cap, this meant for example, the monster have 1 HP left before you killed it, this could possibly be a reason as to why it took slightly over 1650 kills on an Ellin Forest monster despite the pity cap being exactly 1650.
It is speculated that when in a party, if you do not damage the monster and your party member kills it, it will NOT count towards the pity cap, afterall, you need to hit the monster in order to get a kill credit and a chance to register the monster
If a pity cap exists, it will only count kills from the day the monster debuted in Monster Collection, not the day the monster first appeared in the game.
To minimise the error margin, I only tested regular monsters with pure spawning maps, hence, a number of monsters are omitted. Note that with a few exceptions stated otherwise in brackets, most of the monsters here are tested using their intended collection method. Manual adjustments are done to remove elite monsters that were killed as they do not count towards the pity cap.
A trick that is used to workaround Bounty Hunter portals is the Level 10 Cadena trick (specifically: Protect Polo, Stormwing and Especia's Totem Slash). An alternative is to use Ark (noting that Ark cannot leave Verdel normally without completing the quests).
As Cadena is unable to gain EXP outside Savage Terminal prior to the completion of the storyline quests, Cadena can be used to spawn portals outside Savage Terminal. Before using my Cadena, I spawned 18 Especia portals in total on my main and mules (assuming that the totem spawn averages at 7 per type per run). After I felt that I have killed sufficient totems to pity cap all 4 regular types, I took my Level 10 Cadena, spawned the Especia portal, and is successfully able to collect all 4 regular totems in a single run.
14.1 Collection Rate for monsters Level 120 and below
All monsters under this section are registered using the intended method with the exception of Sparrow and Axe Stump which are farmed in Ellinia and the Warrior Specter which is farmed in Verdel as a low level variant.
The kill count pity cap is based on the mobID of the monster and is based on the level of the monster when it is registered, this means that if I were to kill a Level 51-59 variant of a Theme Dungeon monster instead of a Level 30-50 variant of the same monster, it will take more kills on average to register. This can be seen in the tables below where a Level 48 monster from Gold Beach took 320 kills, while a Level 52 Gold Beach monster can take up to 500 kills to register.
To read the tables below, click on the spoilers, any monster that are registered at the guaranteed cap is highlighted in yellow.
The cap for Level 11 to 20 Monsters seems to be set at 200 monsters killed.
The cap for Level 21 to 30 Monsters seems to be set at 240 monsters killed.
The cap for Level 31 to 50 Monsters seems to be set at 320 monsters killed.
The cap for Level 51 to 70 monsters seems to be set at 500 monsters killed. Due to the limited number of monsters with fixed level range between Level 51-60, I've used theme dungeon monsters that scales up to Level 59 as samples.
The cap for Level 71 to 100 Monsters seems to be set at 1650 monsters killed. Due to a noticeable increase in variance, more testing is required for confirmation.
As the pity cap for Level 71-100 is speculated to be 1650, and the fact that the pity cap cumulates across all characters in the same world, Monster Collection Discord user Shampion has tested pre-capping Mote and Poison Mote by killing at least 1650 of them on a high levelled character. When he brought his Level 100 character into Friendstory to kill those two monsters, Mote and Poison Mote registered on their first kills respectively (note the timer at the top of the map and the timestamps in the screenshot).
The original testing for Level 101-120 monsters was done in 2016 in Insoya, while the data was no longer accessible, the testing noted a massive spike in collection variance starting from Level 121. A possible reason why Level 120 and below monsters are easier to register is that the pity cap ends at Level 120.
I speculated 5k to be the pity cap in May 2022 when I tested Dark Rashes. At then, it felt coincidental that Dark Rash registered at a very nice number, with my only reference hinting a possible pity cap being info from Insoya.
Monster Collection Discord user Shampion did his testing by pre-capping Chryse PQ monsters as seen in the screenshot below, counting and killing 5k of them on a high level character before taking a Level 112 mule to test the existence of a pity cap. When he entered and performed the party quest, Rabbit, Mammoth and Kephivara registered on their first kills (noting the timestamps in the textbox), indicating the possibility that a pity cap does exist.
15. FREQUENTLY ASKED QUESTIONS
Q: Are 2 star monsters easier to collect than 1 star monsters?
A: Honestly, based on experience, no, they are the same as two star monsters typically refers to a starforced version of a monster (or an arcane river monster as they require arcane force), there are a few exceptions to the starforce rule such as Fallen Eagle Warrior (anti-AFK mob from Fallen World Tree) and Dark Eye from Another Dimension, however, they are equally as difficult to register as compared regular monsters, bosses with 2 star difficulty seem to have the same collection rate as other bosses.
To further elaborate based on observations, registration chance seems to be divided into three categories regardless of number of stars:
Regular Monster (1 or 2 star mobs): Collection chance is scaled to level (up to Level 121)
Boss Monster (excluding King Castle Golem, including 2 star bosses like Mushmom and Timer): All bosses seem to have an average of 1/50 chance of registering
Elite Monster (unsure if Sage Cat classifies as this or as a boss): The exact chance is unknown it takes around 1-3 tries on average, results may vary as it took me 6 tries to register Evasive Red Flower Serpent
16. CREDITS
Dexless:
- PirateIzzy for various information pertaining to GMS monster variants and other various Monster Collection information
- Sky for The Seed Guide
- Zelly for Balrog Boss Guide
Reddit:
- u/squishypearls on Reddit for the clarification on monster level range to spawn elite monsters
- u/RobinLionHeart and u/Retredre on Reddit for information relating to Prison Guard Boar and Rhinos
Discord:
- Maplestory Monster Collection Discord server for helping to compile information on rewards and trait items
- Bryan of Monster Collection Discord for info on King Castle Golem
- Bready of MapleSEA Discord for info on elite monster prefixes and information on bounty hunter portals
- Ministriy of Monster Collection Discord for the monster collection elite samples and tips to collect Huge Golem and Reverse Dark Soul
- Strival of Monster Collection Discord for info on Cross World Party Quest monsters and confirmation that CWPQ mobs can be registered
- Akuma and Keni of MapleSEA Discord for running Magatia PQ in the screenshots for the guide on Angry Frankrenroid
- FSXerath of MapleSEA Discord for information on runes, elite spawn location and character location proximity
- Young Rhinne of MapleSEA Discord for the Victoria Isles Collector Medal image
- Shampion of Monster Collection Discord for information on Pyramid PQ monsters spawn count, Omen portal spawn information, screenshots for Chryse and Friendstory monsters and pity cap testing
- Whacky of MapleSEA Discord for the images of the new Monster Collection pages released in KMS (now replaced with MSEA ingame screenshots)
- Thom of Monster Collection Discord for the image of collecting Motes via Kinesis storyline
Other sources:
- Orange Mushroom Blog for then images of the 3 new pages of Monster Collection released in KMST Neo Patch (now replaced with MSEA ingame screenshots) and KMS information pertaining to Monster Collection in Cross World PQ
- Insoya (defunct) and Southperry forums for the info on the collection rates for Level 121 and above monsters
- SSUNEE on Youtube for the guide to collecting Scarecrow via Mirror World
No parts of this guide, whether whole or part of it, should be reproduced without my permission, if you wish to re-upload this guide, spotted any errors in the guide or have any interesting tips to share and would like to contribute, kindly drop me a message or contact me on Reddit, my username is u/JuddtheStormcaster[/SPOILER]
A Comprehensive Guide to Monster Collection
Guide in 'General Guides' published by JuddStorm, Jan 2, 2023.
This is a comprehensive guide to monster collection which includes a starter's guide and recommended boxes to collect
-
-
Guide Author JuddStorm, Find all guides by JuddStorm
-
-
Guide Version
2.6Game Version
2.17Changelog
Added Friendstory Shinsoo High monsters from the latest KMS patch, edited Mu Gong's monster collection section to reflect the recent changes - Loading...
![[IMG]](https://i.imgur.com/J6VhoAI.png)
![[IMG]](https://i.imgur.com/d40ntFJ.png)
![[IMG]](https://media.discordapp.net/attachments/679242096326082572/894208522017988618/unknown.png)
![[IMG]](https://i.redd.it/5k2x6w5nvez31.png)
![[IMG]](https://i.redd.it/3dkz9psvvez31.png)
![[IMG]](https://i.redd.it/f21yqwhcwez31.png)
![[IMG]](https://i.redd.it/8wic4yggvez31.png)
![[IMG]](https://i.imgur.com/G7o7PHW.png)
![[IMG]](https://i.imgur.com/GCcwSo6.png)
![[IMG]](https://i.imgur.com/pK9bcJT.png)
![[IMG]](https://i.imgur.com/W0dTjDA.png)
![[IMG]](https://i.imgur.com/3zBgaaL.png)
![[IMG]](https://media.discordapp.net/attachments/679242096326082572/1049327390276468786/uRbYsAJ.png)
![[IMG]](https://i.imgur.com/uoBali7.png)
![[IMG]](https://i.imgur.com/5bSLqny.png)
![[IMG]](https://i.imgur.com/IJEXANW.png)
![[IMG]](https://i.imgur.com/R2Af5jo.png)
![[IMG]](https://i.imgur.com/pQdqiva.png)
![[IMG]](https://i.imgur.com/vB6z1Id.png)
![[IMG]](https://i.imgur.com/XESsqdR.png)
![[IMG]](https://i.imgur.com/XyItnVk.png)
![[IMG]](https://i.imgur.com/SNuqlaJ.png)
![[IMG]](https://media.discordapp.net/attachments/819061907981074433/1049011448518553620/image.png)
![[IMG]](https://i.redd.it/1q9hqzni6ez31.png)
![[IMG]](https://i.redd.it/5ejmurh16ez31.png)
![[IMG]](https://i.imgur.com/HhtXreu.jpg)
![[IMG]](https://i.redd.it/v9cdhyd3fez31.png)
![[IMG]](https://i.redd.it/m4iscuapfez31.png)
![[IMG]](https://i.redd.it/ugpqpckhgez31.png)
![[IMG]](https://preview.redd.it/8et9zdivaez31.png?width=886&format=png&auto=webp&s=61cd75d7c634ef1d22086bd10e138df76249b370)
![[IMG]](https://i.imgur.com/XJz2i7H.png)
![[IMG]](https://i.imgur.com/I06YrZ6.png)
![[IMG]](https://i.imgur.com/o3nlOSy.png)
![[IMG]](https://i.imgur.com/LWUJSMj.png)
![[IMG]](https://i.imgur.com/7rlfGsE.png)
![[IMG]](https://i.imgur.com/nKmSpj3.png)
![[IMG]](https://i.imgur.com/BdwggEd.png)
![[IMG]](https://i.imgur.com/bCkeo5K.png)
![[IMG]](https://i.imgur.com/MrfV9w7.png)
![[IMG]](https://i.imgur.com/2KmtECL.png)
![[IMG]](https://i.imgur.com/JxK6hMR.png)
![[IMG]](https://i.imgur.com/JmzR4gy.png)
![[IMG]](https://i.imgur.com/8oaGcYo.png)
![[IMG]](https://i.imgur.com/IsKQntQ.png)
![[IMG]](https://i.imgur.com/VR7DY2x.png)
![[IMG]](https://i.imgur.com/wT9HqfT.png)
![[IMG]](https://i.imgur.com/wn18ytT.png)
![[IMG]](https://i.redd.it/ciuohyae7nq21.png)
![[IMG]](https://i.imgur.com/IBtMB4i.png)
![[IMG]](https://i.imgur.com/7EGLX3r.png)
![[IMG]](https://i.imgur.com/Wrx9fUm.png)
![[IMG]](https://i.imgur.com/MFN0Vqj.png)
![[IMG]](https://i.imgur.com/BtrR8uY.png)
![[IMG]](https://i.imgur.com/WkeO3sA.png)
![[IMG]](https://i.imgur.com/kYsuiqs.png)
![[IMG]](https://i.imgur.com/mVDJ78M.png)
![[IMG]](https://i.imgur.com/bwqmaKD.png)
![[IMG]](https://vignette.wikia.nocookie.net/maplestory/images/6/65/Mob_Deadly_Altar.png/revision/latest/scale-to-width-down/100?cb=20130508152000)
![[IMG]](https://vignette.wikia.nocookie.net/maplestory/images/d/df/Mob_Spearman_Skeleknight.png/revision/latest/scale-to-width-down/100?cb=20130505062624)
![[IMG]](https://vignette.wikia.nocookie.net/maplestory/images/a/a3/Mob_Bloodfang.png/revision/latest/scale-to-width-down/100?cb=20130505062702)
![[IMG]](https://static.wikia.nocookie.net/maplestory/images/6/6a/Mob_Hilla_%28Gray_Maiden%29.png/revision/latest/scale-to-width-down/161?cb=20121217142223)
![[IMG]](https://vignette.wikia.nocookie.net/maplestory/images/a/ae/Mob_Giant_Blackheart.png/revision/latest/scale-to-width-down/100?cb=20130928005233)
![[IMG]](https://i.imgur.com/jM6Zbzt.png)
![[IMG]](https://i.imgur.com/ic0eYLX.png)
![[IMG]](https://i.imgur.com/eUc0YuX.png)
![[IMG]](https://i.imgur.com/mF5GiFm.png)
![[IMG]](https://i.imgur.com/ctwiqwz.png)
![[IMG]](https://i.imgur.com/fnyxDw8.png)
![[IMG]](https://i.imgur.com/yhL3TVB.png)
![[IMG]](https://i.imgur.com/poOFlnL.png)
![[IMG]](https://i.imgur.com/cJ7sLO6.png)
![[IMG]](https://i.imgur.com/bqyyNbA.png)
![[IMG]](https://i.imgur.com/3e5uNx6.png)
![[IMG]](https://i.imgur.com/0URcKUM.png)
![[IMG]](https://i.imgur.com/B1XyidZ.png)
![[IMG]](https://i.imgur.com/We6CN3g.png)
![[IMG]](https://i.imgur.com/CB16287.png)
![[IMG]](https://i.imgur.com/jTpgYVh.png)
![[IMG]](https://i.imgur.com/qsrjiaG.png)
![[IMG]](https://i.imgur.com/WQmLqEz.png)
![[IMG]](https://i.imgur.com/5SgS7XH.png)
![[IMG]](https://i.imgur.com/bclkgdo.png)
![[IMG]](https://i.imgur.com/A8TD0L8.png)
![[IMG]](https://i.imgur.com/o86MtkJ.png)
![[IMG]](https://i.imgur.com/4q93qNA.png)
![[IMG]](https://i.imgur.com/sICS4ep.png)
![[IMG]](https://i.imgur.com/pU9EJtR.png)
![[IMG]](https://i.imgur.com/PpC4Z35.png)
![[IMG]](https://i.imgur.com/NO1mjYC.png)
![[IMG]](https://i.imgur.com/sqBAvyf.png)
![[IMG]](https://i.imgur.com/KxnXJaa.png)
![[IMG]](https://i.imgur.com/ExPXLVJ.png)
![[IMG]](https://i.imgur.com/rbAj1xp.png)
![[IMG]](https://i.imgur.com/SNJP3M4.png)
![[IMG]](https://i.imgur.com/T7ax414.png)
![[IMG]](https://i.imgur.com/UZDDbkO.png)
![[IMG]](https://i.imgur.com/NDMHjzj.png)
![[IMG]](https://i.imgur.com/JzHCRoB.png)
![[IMG]](https://i.imgur.com/1bdvrSW.png)
![[IMG]](https://i.imgur.com/LTj2s77.png)
![[IMG]](https://i.imgur.com/VYq57KN.png)
![[IMG]](https://i.imgur.com/YzjL1IR.png)
![[IMG]](https://i.imgur.com/TQSaHJQ.png)
![[IMG]](https://i.imgur.com/mhFw4v7.png)
![[IMG]](https://i.imgur.com/lBaLQ5u.png)
![[IMG]](https://i.imgur.com/cG9d6rv.png)
![[IMG]](https://i.imgur.com/nkasjSG.png)
![[IMG]](https://i.imgur.com/z8OiaLh.png)
![[IMG]](https://i.imgur.com/e91wmUO.png)
![[IMG]](https://i.imgur.com/gnFGF32.png)
![[IMG]](https://i.imgur.com/lwl4fTg.png)
![[IMG]](https://i.imgur.com/XCnH2ls.png)
![[IMG]](https://i.imgur.com/YvIsm0t.png)
![[IMG]](https://i.imgur.com/UzAi2jC.png)
![[IMG]](https://i.imgur.com/tRTEzFU.png)
![[IMG]](https://i.imgur.com/FWBoSv6.png)
![[IMG]](https://i.imgur.com/72qcpYm.png)
![[IMG]](https://i.imgur.com/Y0xyY4B.png)
![[IMG]](https://i.imgur.com/jG9HBey.png)
![[IMG]](https://i.imgur.com/Xe3YxNN.png)
![[IMG]](https://preview.redd.it/7mi61zh3n8731.png?width=884&format=png&auto=webp&s=9dc4ce3c6fc3580a782704045b9f15e42df2b7fa)
![[IMG]](https://preview.redd.it/zfj345bhllx21.jpg?width=1024&format=pjpg&auto=webp&s=ca60a696ac85d1e26c277c0a91a64ae97e49bae9)
![[IMG]](https://preview.redd.it/45i5hzn7p8731.png?width=1023&format=png&auto=webp&s=a0e63c493fe8135b0bf4d498ecfcdf660692a20c)
![[IMG]](https://i.imgur.com/XbVrQnp.png)
![[IMG]](https://i.imgur.com/jK2Ecz6.png)
![[IMG]](https://preview.redd.it/7y1hrfuho8731.png?width=1020&format=png&auto=webp&s=1fb96f4085953df012cccdc79200a0bb7d5b843b)
![[IMG]](https://media.discordapp.net/attachments/679242096326082572/888475010149273700/unknown.png?width=987&height=630)
![[IMG]](https://preview.redd.it/a81ojha5z8731.png?width=1021&format=png&auto=webp&s=ca8c7dc69f45509d5969eb71d4bbc7e4afc9ecc2)
![[IMG]](https://media.discordapp.net/attachments/679242096326082572/989944785412427827/unknown.png?width=496&height=630)
![[IMG]](https://media.discordapp.net/attachments/679242096326082572/989945190280204329/unknown.png)
![[IMG]](https://media.discordapp.net/attachments/679242096326082572/989946030495764490/SPOILER_unknown.png?width=873&height=630)
![[IMG]](https://media.discordapp.net/attachments/679242096326082572/989949723932758026/unknown.png)
![[IMG]](https://media.discordapp.net/attachments/679242096326082572/989949724251541524/unknown.png)
![[IMG]](https://media.discordapp.net/attachments/679242096326082572/989949724515790951/unknown.png)
![[IMG]](https://media.discordapp.net/attachments/679242096326082572/989957341568962560/unknown.png)
![[IMG]](https://media.discordapp.net/attachments/679242096326082572/989957487186812948/unknown.png)
![[IMG]](https://media.discordapp.net/attachments/679242096326082572/989958229507330058/unknown.png)
![[IMG]](https://i.imgur.com/1DjLBQr.png)
![[IMG]](https://vignette.wikia.nocookie.net/maplestory/images/7/7b/Mob_Raging_Tome.png/revision/latest?cb=20130518054401)
![[IMG]](https://vignette.wikia.nocookie.net/maplestory/images/1/1c/Setup_Orange_Mushroom_Cube_Chair.png/revision/latest?cb=20160720021039)
![[IMG]](https://vignette.wikia.nocookie.net/maplestory/images/a/ae/Mob_Violet_Clam_Slime.png/revision/latest?cb=20121109154014)
![[IMG]](https://vignette.wikia.nocookie.net/maplestory/images/7/7d/Mob_Starfish_Octopus_Slime.png/revision/latest?cb=20121109154451)
![[IMG]](https://vignette.wikia.nocookie.net/maplestory/images/c/c5/Mob_Possibly-Evil_Seal.png/revision/latest?cb=20130605142403)
![[IMG]](https://vignette.wikia.nocookie.net/maplestory/images/2/2d/Setup_Tino_Cube_Chair.png/revision/latest?cb=20160717014104)
![[IMG]](https://static.wikia.nocookie.net/maplestory/images/6/6b/Mob_Hay_Bundle.png/revision/latest/scale-to-width-down/67?cb=20190613021523)
![[IMG]](https://static.wikia.nocookie.net/maplestory/images/5/5f/Setup_Hoppin%27_Sprout_Cube_Chair.png/revision/latest/scale-to-width-down/38?cb=20201211031136)
![[IMG]](https://vignette.wikia.nocookie.net/maplestory/images/b/bb/Mob_Wild_Boar.png/revision/latest?cb=20100701133117)
![[IMG]](https://vignette.wikia.nocookie.net/maplestory/images/a/a7/Mob_Fire_Boar.png/revision/latest?cb=20100806103037)
![[IMG]](https://vignette.wikia.nocookie.net/maplestory/images/f/f1/Mob_Wooden_Mask.png/revision/latest?cb=20100806103225)
![[IMG]](https://vignette.wikia.nocookie.net/maplestory/images/9/9e/Mob_Mushroom_Chandelier.png/revision/latest/scale-to-width-down/100?cb=20140429042108)
![[IMG]](https://vignette.wikia.nocookie.net/maplestory/images/0/04/Mob_Solemn_Viking.png/revision/latest?cb=20140429043314)
![[IMG]](https://vignette.wikia.nocookie.net/maplestory/images/2/25/Mob_Taurospear.png/revision/latest/scale-to-width-down/100?cb=20080126033819)
![[IMG]](https://vignette.wikia.nocookie.net/maplestory/images/d/dc/Mob_Luster_Pixie.png/revision/latest?cb=20080125190910)
![[IMG]](https://vignette.wikia.nocookie.net/maplestory/images/9/9e/Mob_White_Fang.png/revision/latest?cb=20100808061645)
![[IMG]](https://vignette.wikia.nocookie.net/maplestory/images/8/88/Mob_Enhanced_Security_System.png/revision/latest/scale-to-width-down/100?cb=20100810002931)
![[IMG]](https://vignette.wikia.nocookie.net/maplestory/images/1/13/Setup_Water_Thief_Monster_Cube_Chair.png/revision/latest?cb=20160819080746)
![[IMG]](https://vignette.wikia.nocookie.net/maplestory/images/2/26/Mob_Scorpion.png/revision/latest?cb=20080125020427)
![[IMG]](https://static.wikia.nocookie.net/maplestory/images/6/66/Setup_Hare_Cube_Chair.png/revision/latest?cb=20160805022434)
![[IMG]](https://vignette.wikia.nocookie.net/maplestory/images/b/be/Mob_Triple_Rumo.png/revision/latest?cb=20100809130439)
![[IMG]](https://vignette.wikia.nocookie.net/maplestory/images/0/0b/Mob_Neo_Huroid.png/revision/latest?cb=20100810002822)
![[IMG]](https://vignette.wikia.nocookie.net/maplestory/images/e/e2/Mob_Block_Golem.png/revision/latest/scale-to-width-down/100?cb=20080125075249)
![[IMG]](https://vignette.wikia.nocookie.net/maplestory/images/6/65/Setup_Robo_Cube_Chair.png/revision/latest?cb=20160804000737)
![[IMG]](https://vignette.wikia.nocookie.net/maplestory/images/d/d5/Mob_Homunscullo.png/revision/latest/scale-to-width-down/100?cb=20080126043556)
![[IMG]](https://vignette.wikia.nocookie.net/maplestory/images/f/fc/Mob_Primitive_Boar.png/revision/latest/scale-to-width-down/100?cb=20100809130640)
![[IMG]](https://vignette.wikia.nocookie.net/maplestory/images/a/a6/Mob_Bone_Fish.png/revision/latest/scale-to-width-down/100?cb=20080126003621)
![[IMG]](https://vignette.wikia.nocookie.net/maplestory/images/4/4b/Setup_Scuba_Pepe_Cube_Chair.png/revision/latest?cb=20160805020900)
![[IMG]](https://vignette.wikia.nocookie.net/maplestory/images/e/ef/Mob_Cold_Shark.png/revision/latest/scale-to-width-down/100?cb=20080126001428)
![[IMG]](https://vignette.wikia.nocookie.net/maplestory/images/1/14/Mob_Robo.png/revision/latest?cb=20080125075327)
![[IMG]](https://vignette.wikia.nocookie.net/maplestory/images/d/d3/Mob_Reaper_Specter.png/revision/latest/scale-to-width-down/100?cb=20120721045742)
![[IMG]](https://vignette.wikia.nocookie.net/maplestory/images/9/93/Setup_Specter_Cube_Chair.png/revision/latest?cb=20160820073932)
![[IMG]](https://vignette.wikia.nocookie.net/maplestory/images/6/69/Mob_Dual_Ghost_Pirate.png/revision/latest/scale-to-width-down/100?cb=20080126013038)
![[IMG]](https://vignette.wikia.nocookie.net/maplestory/images/4/41/Mob_Jellybus.png/revision/latest/scale-to-width-down/100?cb=20080928104823)
![[IMG]](https://vignette.wikia.nocookie.net/maplestory/images/3/3d/Mob_Coolie_Zombie.png/revision/latest?cb=20080125195521)
![[IMG]](https://vignette.wikia.nocookie.net/maplestory/images/3/3a/Setup_Yeti_Cube_Chair.png/revision/latest?cb=20160803050401)
![[IMG]](https://vignette.wikia.nocookie.net/maplestory/images/e/ed/Mob_Castle_Golem.png/revision/latest/scale-to-width-down/100?cb=20100909103435)
![[IMG]](https://static.wikia.nocookie.net/maplestory/images/5/54/Mob_Garden_Golem.png/revision/latest?cb=20131010222254)
![[IMG]](https://static.wikia.nocookie.net/maplestory/images/0/05/Setup_Zakum_Cube_Chair.png/revision/latest?cb=20220818231404)
![[IMG]](https://vignette.wikia.nocookie.net/maplestory/images/d/de/Mob_Red_Goblin.png/revision/latest/scale-to-width-down/100?cb=20120808152715)
![[IMG]](https://static.wikia.nocookie.net/maplestory/images/c/cc/Mob_Flared_Chargin%27_Sprout.png/revision/latest/scale-to-width-down/143?cb=20190331192417)
![[IMG]](https://vignette.wikia.nocookie.net/maplestory/images/e/ef/Mob_Red_Flower_Serpent.png/revision/latest?cb=20080125080942)
![[IMG]](https://vignette.wikia.nocookie.net/maplestory/images/b/bc/Setup_Grizzly_Cube_Chair.png/revision/latest?cb=20160818010237)
![[IMG]](https://vignette.wikia.nocookie.net/maplestory/images/1/1f/Mob_Green_King_Goblin.png/revision/latest/scale-to-width-down/100?cb=20080126060232)
![[IMG]](https://vignette.wikia.nocookie.net/maplestory/images/f/f6/Mob_Dark_Wyvern.png/revision/latest/scale-to-width-down/100?cb=20191103164920)
![[IMG]](https://vignette.wikia.nocookie.net/maplestory/images/8/84/Setup_Birk_Cube_Chair.png/revision/latest?cb=20160818013829)
![[IMG]](https://static.wikia.nocookie.net/maplestory/images/2/24/Mob_Frenzied_Ruins_Sentinel.png/revision/latest/scale-to-width-down/137?cb=20190331192420)
![[IMG]](https://vignette.wikia.nocookie.net/maplestory/images/a/aa/Mob_Enraged_Espresso_Machine.png/revision/latest/scale-to-width-down/100?cb=20161028030942)
![[IMG]](https://vignette.wikia.nocookie.net/maplestory/images/4/49/Mob_Chief_Qualm_Guardian.png/revision/latest/scale-to-width-down/100?cb=20100815134855)
![[IMG]](https://vignette.wikia.nocookie.net/maplestory/images/f/f4/Mob_Chief_Oblivion_Guardian.png/revision/latest/scale-to-width-down/100?cb=20100816103130)
![[IMG]](https://vignette.wikia.nocookie.net/maplestory/images/a/ab/Mob_Poison_Hornet.png/revision/latest/scale-to-width-down/100?cb=20130418140755)
![[IMG]](https://vignette.wikia.nocookie.net/maplestory/images/5/52/Mob_Corrupted_Rock_Spirit.png/revision/latest?cb=20130418140904)
![[IMG]](https://vignette.wikia.nocookie.net/maplestory/images/8/88/Mob_Mutant_Ribbon_Pig.png/revision/latest/scale-to-width-down/100?cb=20101224163357)
![[IMG]](https://static.wikia.nocookie.net/maplestory/images/4/44/Mob_Gray_Commuter_Saucer.png/revision/latest/scale-to-width-down/100?cb=20170113202751)
![[IMG]](https://static.wikia.nocookie.net/maplestory/images/a/a0/Setup_OMNI-CLN_Cube_Chair.png/revision/latest/scale-to-width-down/34?cb=20201211031355)
![[IMG]](https://static.wikia.nocookie.net/maplestory/images/c/c9/Mob_Black_Robosaucer.png/revision/latest/scale-to-width-down/100?cb=20170119022218)
![[IMG]](https://static.wikia.nocookie.net/maplestory/images/b/b2/Mob_Dangerous_Nutria.png/revision/latest?cb=20181116072457)
![[IMG]](https://static.wikia.nocookie.net/maplestory/images/6/61/Setup_Back_Alley_Cat_Cube_Chair.png/revision/latest?cb=20220819010911)
![[IMG]](https://static.wikia.nocookie.net/maplestory/images/e/e4/Mob_Spine_Glooger.png/revision/latest?cb=20181116072925)
![[IMG]](https://vignette.wikia.nocookie.net/maplestory/images/0/0d/Mob_Swollen_Axe_Stump.png/revision/latest?cb=20130216150702)
![[IMG]](https://vignette.wikia.nocookie.net/maplestory/images/a/a9/Mob_Vicious_Squirrel.png/revision/latest/scale-to-width-down/100?cb=20171026044917)
![[IMG]](https://vignette.wikia.nocookie.net/maplestory/images/8/8f/Setup_Sky_Guardian_Spirit_Cube_Chair.png/revision/latest?cb=20181018044208)
![[IMG]](https://vignette.wikia.nocookie.net/maplestory/images/f/fb/Mob_Ancient_Mixed_Golem.png/revision/latest/scale-to-width-down/100?cb=20130216150832)
![[IMG]](https://vignette.wikia.nocookie.net/maplestory/images/b/b4/Mob_Modded_Broken_Android.png/revision/latest?cb=20150115021657)
![[IMG]](https://static.wikia.nocookie.net/maplestory/images/6/67/Mob_Monto.png/revision/latest/scale-to-width-down/100?cb=20191213045746)
![[IMG]](https://static.wikia.nocookie.net/maplestory/images/5/5f/Setup_Kumpider_Cube_Chair.png/revision/latest/scale-to-width-down/36?cb=20201211032951)
![[IMG]](https://vignette.wikia.nocookie.net/maplestory/images/7/77/Mob_Tranquil_Erda.png/revision/latest/scale-to-width-down/100?cb=20160718035711)
![[IMG]](https://vignette.wikia.nocookie.net/maplestory/images/9/95/Setup_Ripe_Wolfruit_Cube_Chair.png/revision/latest?cb=20170530182805)
![[IMG]](https://static.wikia.nocookie.net/maplestory/images/e/e3/Mob_Exterminator_T-Drone_Model_B.png/revision/latest/scale-to-width-down/100?cb=20191213045935)
![[IMG]](https://vignette.wikia.nocookie.net/maplestory/images/3/3e/Mob_Ripe_Wolfruit.png/revision/latest/scale-to-width-down/100?cb=20160818081853)
![[IMG]](https://vignette.wikia.nocookie.net/maplestory/images/a/a1/Mob_Dark_Demon_Axemaster.png/revision/latest?cb=20160308001152)
![[IMG]](https://vignette.wikia.nocookie.net/maplestory/images/b/bd/Setup_Crimson_Stirge_Cube_Chair.png/revision/latest?cb=20170530182551)
![[IMG]](https://vignette.wikia.nocookie.net/maplestory/images/3/39/Mob_Steel_Xenoroid_EX.png/revision/latest?cb=20150115035734)
![[IMG]](https://vignette.wikia.nocookie.net/maplestory/images/2/21/Mob_Alloy_Xenoroid_DX.png/revision/latest?cb=20150115035736)
![[IMG]](https://vignette.wikia.nocookie.net/maplestory/images/4/4f/Mob_Patriarch_Crilia.png/revision/latest/scale-to-width-down/100?cb=20160818190731)
![[IMG]](https://static.wikia.nocookie.net/maplestory/images/d/d3/Mob_Stonepy.png/revision/latest/scale-to-width-down/165?cb=20200207001317)
![[IMG]](https://vignette.wikia.nocookie.net/maplestory/images/6/68/Mob_Red_Dancing_Shoes.png/revision/latest?cb=20160818194913)
![[IMG]](https://vignette.wikia.nocookie.net/maplestory/images/d/de/Mob_Thunder_Cloud_Spirit.png/revision/latest/scale-to-width-down/100?cb=20170203021356)
![[IMG]](https://vignette.wikia.nocookie.net/maplestory/images/3/37/Setup_Nameless_Cat_Cube_Chair.png/revision/latest?cb=20171216045956)
![[IMG]](https://vignette.wikia.nocookie.net/maplestory/images/d/d6/Mob_Thralled_Warhammer_Knight.png/revision/latest/scale-to-width-down/100?cb=20170901071006)
![[IMG]](https://vignette.wikia.nocookie.net/maplestory/images/8/85/Mob_Dark_Executor.png/revision/latest/scale-to-width-down/100?cb=20180125022045)
![[IMG]](https://static.wikia.nocookie.net/maplestory/images/d/de/Mob_Ebonstar_Magician.png/revision/latest/scale-to-width-down/100?cb=20201210135922)
![[IMG]](https://static.wikia.nocookie.net/maplestory/images/f/f0/Setup_Chosen_Seren_Cube_Chair.png/revision/latest?cb=20220819010851)
![[IMG]](https://static.wikia.nocookie.net/maplestory/images/4/44/Mob_Houndbot.png/revision/latest/scale-to-width-down/100?cb=20210121062957)
![[IMG]](https://static.wikia.nocookie.net/maplestory/images/5/5f/Setup_Kalos_the_Guardian_Cube_Chair.png/revision/latest?cb=20220819010852)
![[IMG]](https://static.wikia.nocookie.net/maplestory/images/0/0a/Mob_Black_Knight.png/revision/latest/scale-to-width-down/100?cb=20160408035601)
![[IMG]](https://static.wikia.nocookie.net/maplestory/images/3/31/Mob_Mad_Mage.png/revision/latest/scale-to-width-down/100?cb=20160413041716)
![[IMG]](https://static.wikia.nocookie.net/maplestory/images/1/11/Mob_Rampant_Cyborg.png/revision/latest/scale-to-width-down/100?cb=20180801222358)
![[IMG]](https://static.wikia.nocookie.net/maplestory/images/1/1b/Mob_Vicious_Hunter.png/revision/latest/scale-to-width-down/100?cb=20180801222641)
![[IMG]](https://static.wikia.nocookie.net/maplestory/images/3/36/Mob_Bad_Brawler.png/revision/latest/scale-to-width-down/100?cb=20180801224043)
![[IMG]](https://static.wikia.nocookie.net/maplestory/images/e/e7/Mob_Flaming_Great_Spirit.png/revision/latest/scale-to-width-down/100?cb=20220721152945)
![[IMG]](https://static.wikia.nocookie.net/maplestory/images/3/36/Mob_Flora_Commander.png/revision/latest/scale-to-width-down/100?cb=20220721152955)
![[IMG]](https://static.wikia.nocookie.net/maplestory/images/d/d6/Mob_Sheriff_of_Wastes.png/revision/latest/scale-to-width-down/100?cb=20220818164124)
![[IMG]](https://static.wikia.nocookie.net/maplestory/images/0/07/Mob_Odium%27s_Guard.png/revision/latest/scale-to-width-down/100?cb=20220818073506)
![[IMG]](https://preview.redd.it/gw47n8ard1o61.png?width=1023&format=png&auto=webp&s=7fefc35d5cc05b6539ea680b5017b23d8b8e952a)
![[IMG]](https://i.imgur.com/B8JgFQN.png)
![[IMG]](https://i.imgur.com/SWU1HtD.png)
![[IMG]](https://i.imgur.com/vllZOyi.png)
![[IMG]](https://i.imgur.com/gPWh7x0.png)
![[IMG]](https://i.imgur.com/OTu7q5J.png)
![[IMG]](https://i.imgur.com/XQSyvk0.jpg)
![[IMG]](https://i.imgur.com/zLnLPf8.jpg)
![[IMG]](https://media.discordapp.net/attachments/680400411223785492/845699297193623642/unknown.png?width=989&height=630)
![[IMG]](https://static.wikia.nocookie.net/maplestory/images/a/a8/Mob_Nefarious_Monk_Initiate.png/revision/latest?cb=20120721044716)
![[IMG]](https://static.wikia.nocookie.net/maplestory/images/0/07/Mob_Nefarious_Monk_Apprentice.png/revision/latest?cb=20120721044722)
![[IMG]](https://static.wikia.nocookie.net/maplestory/images/f/fd/Mob_Nefarious_Monk_Master.png/revision/latest?cb=20120721045347)
![[IMG]](https://i.imgur.com/QiCyOpf.png)
![[IMG]](https://i.imgur.com/HpJ8Ixl.png)
![[IMG]](https://static.wikia.nocookie.net/maplestory/images/a/a7/Mob_Heretic_Monk_Initiate.png/revision/latest?cb=20120721045353)
![[IMG]](https://static.wikia.nocookie.net/maplestory/images/4/43/Mob_Heretic_Monk_Apprentice.png/revision/latest?cb=20120721045357)
![[IMG]](https://static.wikia.nocookie.net/maplestory/images/0/0f/Mob_Heretic_Leader.png/revision/latest?cb=20120721045403)
![[IMG]](https://i.imgur.com/KtkaB9c.png)
![[IMG]](https://i.imgur.com/awZyinR.png)
![[IMG]](https://i.imgur.com/fmGT3UA.png)
![[IMG]](https://i.imgur.com/E8C66Nz.png)
![[IMG]](https://static.wikia.nocookie.net/maplestory/images/5/56/Mob_Dark_Obsidian.png/revision/latest/scale-to-width-down/100?cb=20171118190751)
![[IMG]](https://static.wikia.nocookie.net/maplestory/images/1/1b/Mob_Tainted_Practice_Robot.png/revision/latest/scale-to-width-down/89?cb=20180507001856)
![[IMG]](https://static.wikia.nocookie.net/maplestory/images/8/83/Mob_Hazard%27s_Vile_Crony.png/revision/latest/scale-to-width-down/100?cb=20171118184349)
![[IMG]](https://i.imgur.com/gvMILa2.png)
![[IMG]](https://i.imgur.com/EHmUqEF.png)
![[IMG]](https://i.imgur.com/553oaO3.png)
![[IMG]](https://i.imgur.com/89cifY5.png)
![[IMG]](https://i.imgur.com/klqAJvz.png)
![[IMG]](https://static.wikia.nocookie.net/maplestory/images/4/49/Mob_Pine_Nut.png/revision/latest?cb=20191125071637)
![[IMG]](https://i.imgur.com/nqOtfQG.png)
![[IMG]](https://i.imgur.com/81uOOpM.png)
![[IMG]](https://i.imgur.com/pJrMz2t.png)
![[IMG]](https://i.imgur.com/vC3inos.png)
![[IMG]](https://static.wikia.nocookie.net/maplestory/images/9/91/Mob_Master_Red_Nirg.png/revision/latest/scale-to-width-down/245?cb=20100815010644)
![[IMG]](https://i.imgur.com/545jbxR.png)
![[IMG]](https://i.imgur.com/g1SiMoP.png)
![[IMG]](https://static.wikia.nocookie.net/maplestory/images/f/ff/Mob_Blazin%27_Brazier.png/revision/latest/scale-to-width-down/290?cb=20190331192422)
![[IMG]](https://i.imgur.com/x9sAG0D.png)
![[IMG]](https://i.imgur.com/7LwauJo.png)
![[IMG]](https://static.wikia.nocookie.net/maplestory/images/6/61/Mob_Corrupted_Warrior.png/revision/latest/scale-to-width-down/133?cb=20180906050153)
![[IMG]](https://vignette.wikia.nocookie.net/maplestory/images/f/f7/Mob_Prison_Guard_Boar.png/revision/latest/scale-to-width-down/100?cb=20100909103440)
![[IMG]](https://vignette.wikia.nocookie.net/maplestory/images/c/c4/Mob_Prison_Guard_Rhino.png/revision/latest/scale-to-width-down/100?cb=20100909103444)
![[IMG]](https://static.wikia.nocookie.net/maplestory/images/4/4e/Mob_King_Castle_Golem.png/revision/latest/scale-to-width-down/285?cb=20131010222430)
![[IMG]](https://static.wikia.nocookie.net/maplestory/images/4/4d/Mob_Blackheart_Negative.png/revision/latest/scale-to-width-down/414?cb=20180906035739)
![[IMG]](https://static.wikia.nocookie.net/maplestory/images/8/8a/Mob_Eye_of_Time.png/revision/latest/scale-to-width-down/52?cb=20100815035222)
![[IMG]](https://static.wikia.nocookie.net/maplestory/images/7/7d/Mob_Blood_Harp.png/revision/latest/scale-to-width-down/64?cb=20191103164902)
![[IMG]](https://i.imgur.com/sP2MOnL.png)
![[IMG]](https://i.imgur.com/pc1HQdN.png)
![[IMG]](https://i.imgur.com/iqBjW0f.png)
![[IMG]](https://i.imgur.com/CZCCIT0.png)
![[IMG]](https://vignette.wikia.nocookie.net/maplestory/images/e/ea/Mob_D._Roy.png/revision/latest/scale-to-width-down/100?cb=20100810013445)
![[IMG]](https://i.imgur.com/74tWEne.png)
![[IMG]](https://i.imgur.com/LKMAaXU.png)
![[IMG]](https://static.wikia.nocookie.net/maplestory/images/b/b1/Mob_Rombot.png/revision/latest/scale-to-width-down/157?cb=20130528142729)
![[IMG]](https://i.imgur.com/LTLtjgT.png)
![[IMG]](https://i.imgur.com/bJO1qFD.png)
![[IMG]](https://i.imgur.com/lxpE8ul.png)
![[IMG]](https://i.imgur.com/btoP1t7.png)
![[IMG]](https://i.imgur.com/NAG8uEc.png)
![[IMG]](https://i.imgur.com/c2IEwCF.png)
![[IMG]](https://static.wikia.nocookie.net/maplestory/images/4/49/Mob_Baby_Balrog.png/revision/latest?cb=20100808025459)
![[IMG]](https://media.discordapp.net/attachments/679242096326082572/1052128340003258388/image.png)
![[IMG]](https://i.imgur.com/an4fQX8.png)
![[IMG]](https://i.imgur.com/A5J0kb9.png)
![[IMG]](https://vignette.wikia.nocookie.net/maplestory/images/1/15/Mob_Blue_Flower_Cow.png/revision/latest/scale-to-width-down/100?cb=20140421185053)
![[IMG]](https://vignette.wikia.nocookie.net/maplestory/images/8/83/Mob_Green_Flower_Cow.png/revision/latest/scale-to-width-down/100?cb=20140421185100)
![[IMG]](https://vignette.wikia.nocookie.net/maplestory/images/c/c9/Mob_White_Thorny_Bear.png/revision/latest/scale-to-width-down/100?cb=20140421185506)
![[IMG]](https://vignette.wikia.nocookie.net/maplestory/images/2/2f/Mob_Brown_Thorny_Bear.png/revision/latest/scale-to-width-down/100?cb=20140421185510)
![[IMG]](https://vignette.wikia.nocookie.net/maplestory/images/7/7f/Mob_Yellow_Curly_Cow.png/revision/latest/scale-to-width-down/100?cb=20140424061912)
![[IMG]](https://vignette.wikia.nocookie.net/maplestory/images/2/23/Mob_Blue_Insectivore_Slime.png/revision/latest/scale-to-width-down/100?cb=20140421192816)
![[IMG]](https://vignette.wikia.nocookie.net/maplestory/images/2/2d/Mob_Yellow_Insectivore_Slime.png/revision/latest/scale-to-width-down/100?cb=20140421192821)
![[IMG]](https://vignette.wikia.nocookie.net/maplestory/images/c/c8/Mob_Blue_Ancient_Slime.png/revision/latest/scale-to-width-down/100?cb=20140424061632)
![[IMG]](https://vignette.wikia.nocookie.net/maplestory/images/1/1e/Mob_Ancient_Beetle.png/revision/latest?cb=20140725065127)
![[IMG]](https://vignette.wikia.nocookie.net/maplestory/images/d/d6/Mob_Orange_Ancient_Beetle.png/revision/latest?cb=20140725065130)
![[IMG]](https://preview.redd.it/pw7coaxtxry51.png?width=609&format=png&auto=webp&s=915ed75161c43ff9858636b74a170f00af0c51bc)
![[IMG]](https://i.imgur.com/Ic8i4JC.png)
![[IMG]](https://media.discordapp.net/attachments/679242096326082572/977536755874037830/unknown.png)
![[IMG]](https://media.discordapp.net/attachments/679242096326082572/977536712374894622/unknown.png)
![[IMG]](https://vignette.wikia.nocookie.net/maplestory/images/5/53/Mob_Soaring_Hawk.png/revision/latest?cb=20100810134312)
![[IMG]](https://vignette.wikia.nocookie.net/maplestory/images/f/f4/Mob_Griffey.png/revision/latest/scale-to-width-down/100?cb=20191103164932)
![[IMG]](https://vignette.wikia.nocookie.net/maplestory/images/6/68/Mob_Dragon_Rider.png/revision/latest/scale-to-width-down/100?cb=20091223095226)
![[IMG]](https://i.imgur.com/UWHnGKL.png)
![[IMG]](https://i.imgur.com/C4bOazE.png)
![[IMG]](https://i.imgur.com/HUeMXXj.png)
![[IMG]](https://i.imgur.com/1hdXByY.png)
![[IMG]](https://static.wikia.nocookie.net/maplestory/images/0/0f/Mob_Horus.png/revision/latest/scale-to-width-down/100?cb=20140408200542)
![[IMG]](https://static.wikia.nocookie.net/maplestory/images/7/7b/Mob_Advisor_Mummy.png/revision/latest/scale-to-width-down/100?cb=20140408200548)
![[IMG]](https://static.wikia.nocookie.net/maplestory/images/a/a8/Mob_Pharaoh_Yeti.png/revision/latest?cb=20160805021633)
![[IMG]](https://static.wikia.nocookie.net/maplestory/images/7/79/Mob_Pharaoh_Snake.png/revision/latest?cb=20160805021643)
![[IMG]](https://static.wikia.nocookie.net/maplestory/images/0/07/Mob_Pharoah_Mummy.png/revision/latest/scale-to-width-down/100?cb=20140408200534)
![[IMG]](https://static.wikia.nocookie.net/maplestory/images/b/b4/Mob_Poisoned_Lord_Tree.png/revision/latest/scale-to-width-down/87?cb=20110814064128)
![[IMG]](https://static.wikia.nocookie.net/maplestory/images/0/03/Mob_Poisoned_Stone_Bug.png/revision/latest/scale-to-width-down/113?cb=20110814064133)
![[IMG]](https://static.wikia.nocookie.net/maplestory/images/8/8e/Mob_Poisoned_Spright.png/revision/latest?cb=20110814064103)
![[IMG]](https://static.wikia.nocookie.net/maplestory/images/8/83/Mob_Poison_Golem.png/revision/latest/scale-to-width-down/148?cb=20101102033447)
![[IMG]](https://i.imgur.com/vTKF45y.png)
![[IMG]](https://static.wikia.nocookie.net/maplestory/images/e/e6/Mob_Ghost_Pixie.png/revision/latest/scale-to-width-down/65?cb=20080126052000)
![[IMG]](https://media.discordapp.net/attachments/679242096326082572/946012805532880896/unknown.png)
![[IMG]](https://static.wikia.nocookie.net/maplestory/images/8/87/Mob_Papa_Pixie.png/revision/latest/scale-to-width-down/183?cb=20110901131114)
![[IMG]](https://preview.redd.it/w6ua9xmc4x3a1.png?width=659&format=png&auto=webp&s=c2bdf95a1bb10c2715b81e0f5f4bc89ce7306d7e)
![[IMG]](https://preview.redd.it/9wnkp0mh7x3a1.png?width=816&format=png&auto=webp&s=e2fc1c00c7a7d977b1c7290fe4cb4c7bb443ea7d)
![[IMG]](https://preview.redd.it/ymtl0icb6x3a1.png?width=814&format=png&auto=webp&s=b7ea2891415d781d8be30567601454598ae4daa6)
![[IMG]](https://preview.redd.it/hyrtau1f6x3a1.png?width=819&format=png&auto=webp&s=21c03e462fac79532bb9d965c3fef23b61380cb2)
![[IMG]](https://preview.redd.it/29e7vc9k6x3a1.png?width=817&format=png&auto=webp&s=c36ed04567feb63c400d37e4b7d5bfc298262491)
![[IMG]](https://preview.redd.it/kr3tdrq76x3a1.png?width=811&format=png&auto=webp&s=7cc868ceb7006d23f451902b32f78623e28bd3c3)
![[IMG]](https://preview.redd.it/xs3xcsuw7x3a1.png?width=819&format=png&auto=webp&s=b6499144dfb3f535742d0a6afe57ae98ea8112d6)
![[IMG]](https://preview.redd.it/xfqraumz9x3a1.png?width=825&format=png&auto=webp&s=7c751c22fabfbf0ee04892ff900fe620d173b174)
![[IMG]](https://preview.redd.it/985jrohxr51a1.png?width=1025&format=png&auto=webp&s=8246d70436dfb74b2dae43aa59db3f9ff2f760f0)
![[IMG]](https://preview.redd.it/5v5lpfd2n51a1.png?width=1083&format=png&auto=webp&s=675dc2a202e612c5ce65802dbc3f668e38926943)
![[IMG]](https://preview.redd.it/jxnpif6pm51a1.png?width=1016&format=png&auto=webp&s=7497bc44663426bc34cc90f2c1c3f8e6b9780075)
![[IMG]](https://preview.redd.it/6wp1g1k2q51a1.png?width=1022&format=png&auto=webp&v=enabled&s=3d3c855a2f0f3b63768fbdb262729225f24f6489)
![[IMG]](https://preview.redd.it/ypicnx1tq51a1.png?width=1020&format=png&auto=webp&s=c73ad628c31f8bb9b4f71495534c978625b2f439)
![[IMG]](https://media.discordapp.net/attachments/679242096326082572/956215785456549938/unknown.png)
![[IMG]](https://preview.redd.it/vqygm2hs7zs41.png?width=307&format=png&auto=webp&s=c601dfb6601855048092c71bc957749b1e5e89dc)
![[IMG]](https://preview.redd.it/qjxpazpcttr41.png?width=1025&format=png&auto=webp&s=8d877e25a8d125fc14044e32bac6725b65edadbf)
![[IMG]](https://i.imgur.com/YCr4oiF.png)
![[IMG]](https://i.imgur.com/fbKyoWr.png)
![[IMG]](https://i.imgur.com/MJQSi69.png)
![[IMG]](https://i.imgur.com/U1Yecgq.png)
![[IMG]](https://i.imgur.com/TYfUxfa.png)
![[IMG]](https://i.imgur.com/GLlKcT9.png)
![[IMG]](https://i.imgur.com/jye11Nx.png)
![[IMG]](https://i.imgur.com/1fUtN5C.png)
![[IMG]](https://i.imgur.com/gw1GSLx.png)
![[IMG]](https://i.imgur.com/aj9CNJI.png)
![[IMG]](https://i.imgur.com/nKwLBWf.png)
![[IMG]](https://i.imgur.com/vmCKn6h.png)
![[IMG]](https://i.imgur.com/i8wbH5M.png)
![[IMG]](https://i.imgur.com/OR600nW.png)
![[IMG]](https://i.imgur.com/JjRjc71.png)
![[IMG]](https://media.discordapp.net/attachments/679242096326082572/1051928473695948820/Maple_A_221208_020346.jpg?width=1121&height=630)
![[IMG]](https://media.discordapp.net/attachments/679242096326082572/1051928473893093447/Maple_A_221208_020352.jpg?width=1121&height=630)
![[IMG]](https://media.discordapp.net/attachments/248315264104529920/975681741715017768/unknown.png)
![[IMG]](https://media.discordapp.net/attachments/679242096326082572/1051928474106986536/Maple_A_221208_020755.jpg?width=1121&height=630)
![[IMG]](https://media.discordapp.net/attachments/679242096326082572/1051928474408980541/Maple_A_221208_021029.jpg?width=1121&height=630)
![[IMG]](https://media.discordapp.net/attachments/679242096326082572/1051928474765508675/Maple_A_221208_021416.jpg?width=1121&height=630)